Summary
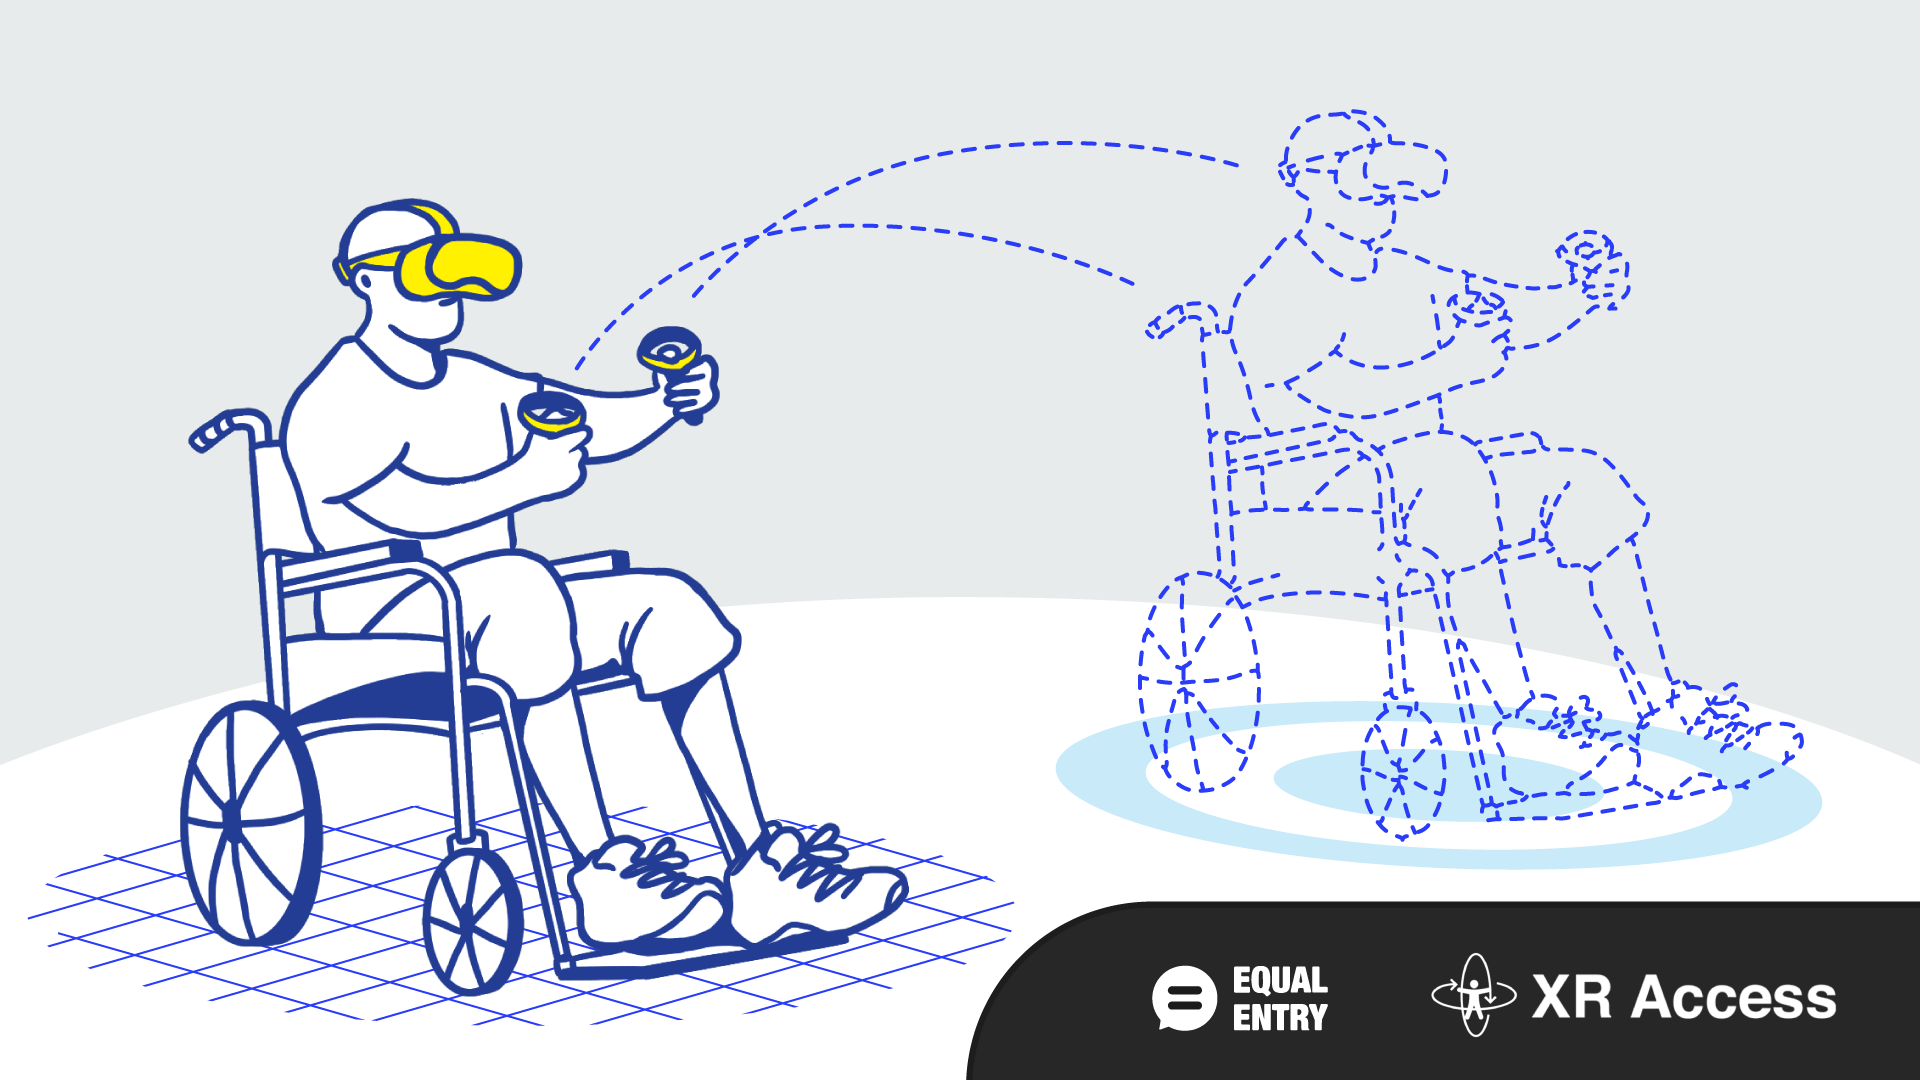
Incorporating diverse locomotion styles in virtual reality (VR) is crucial for creating an inclusive and accessible experience. By offering options such as teleportation, arm swinging, or free movement, VR developers can cater to different preferences, abilities, and comfort levels. People with mobility disabilities benefit from these options, as they can navigate VR environments effortlessly and without physical strain.
The availability of customizable settings further empowers users to optimize their VR experience based on their needs, reducing motion sickness and enhancing their sense of freedom and interaction in virtual worlds. Providing a diversity of locomotion styles creates more welcoming and enjoyable VR experiences for people with disabilities. It also fosters an inclusive virtual environment for all users.
There are many different styles of locomotion that are available in VR. For a list of styles and examples, refer to the Locomotion Vault. (Be aware the page has a lot of motion as it contains many active clips.)
Meta has a set of nine accessibility Virtual Reality Checks (VRC) to enhance accessibility in virtual reality (VR) experiences. Among these, VRC.Quest.Accessibility.8 states “Applications should support multiple locomotion styles when possible. This includes, but is not limited to, teleportation, free locomotion, and snap turning.”
While this VRC serves as a recommendation, it is strongly encouraged that all virtual reality applications incorporate these features. Although Meta’s VRC documentation provides the desired outcomes, it lacks specific implementation guidance.
Therefore, this article aims to provide insights into how developers can effectively implement multiple locomotion styles to improve the accessibility of their VR applications.
Potential Solutions for Locomotion Styles
Locomotion refers to the ways users can move around in a virtual environment. It can be done in different ways. Here are some common ways:
- Teleportation: This is a popular method for locomotion in VR as it helps reduce motion sickness. The user points to a location using the controller and then jumps to that location.
- Smooth locomotion: This is a continuous movement method where the user moves around in the VR environment using the controller’s thumb stick. However, it can cause motion sickness for some users.
- Snap turning: This is a technique that allows users to adjust their view within a virtual environment without physically turning their heads. Instead of physically rotating their bodies, users can simply press a button or interact with a control to instantly change their virtual orientation by a predefined angle, such as 30 or 45 degrees.
- Room-scale VR: This is where the user physically moves around in the real world and the move is replicated in the virtual reality environment. This method provides an immersive experience but requires enough space to move around.
- Hybrid methods: Some games or applications use a combination of the above methods, allowing the user to choose which method they prefer.
Virtual Reality Setup Guide
If you’re new to virtual reality development and want to dive into Unity, here are some resources to help. These guide you through learning about application programming interfaces (API) and setting up the development environment. Here are two useful software development kits (SDK) to get started.
- XR Integration Toolkit
- Installation of XR Interaction Toolkit: Official documentation by Unity
- Easy Unity VR Tutorial for Beginners: Unofficial documentation that is easier to follow.
- Oculus Integration Toolkit
- Get Started with Oculus in Unity: Official documentation by Meta.
How to Implement Multiple Locomotion Styles
The implementation process varies depending on the SDK you choose for building your virtual reality experience. This will guide you through the process using two specific SDKs: the XR Interaction Toolkit (XRIT) from Unity and the Oculus Integration Toolkit from Meta.
This guide uses First Hand to illustrate the steps. First Hand is an open-source project from Oculus Samples on GitHub from Meta.
To implement it on an existing project, download First Hand and follow these steps. Visit Equal Entry’s VRC8 – First Hand GitHub repository to see the fixed code. If you like to just try the experience, download Equal Entry’s and use SideQuest to load it into your Quest.
XR Interaction Toolkit (XRIT)
![]()
Here’s the description of First Hand from Meta’s page:
“First Hand is an official Hand Tracking demo built by Meta. Experience the magic of interacting with the virtual world directly with your hands. Use switches, levers, and virtual UIs as you solve puzzles to build robotic gloves, and then experience their superpowers.”
Steps for Locomotion (Snap Turning, Direct Motion, Teleportation)
Although it is designed to work without hand controllers, it also works with hand controllers. Follow the steps below to implement snap turning using this sample.
- Download First Hand on GitHub and open it in Unity Editor 2020.3.33f1.
- Make sure the “XR Interaction Toolkit” is imported into the project, along with the samples package “Starter Assets“.
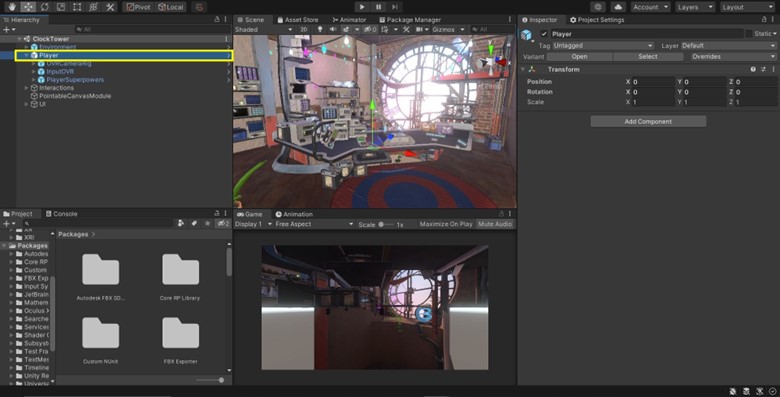
- Select the GameObject “Player” and delete it.

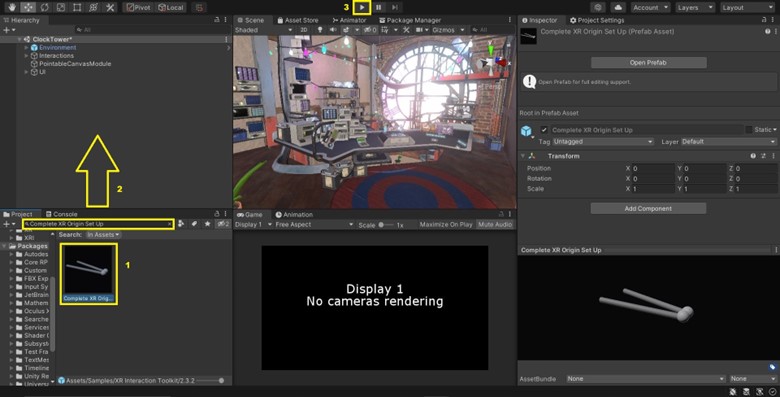
- Search for “Complete XR origin setup” in the Project window. Drag and drop to add the prefab to the scene. Optional: Adjust the position of the object to your preference. Play and test the XR camera.
Snap Turning guide
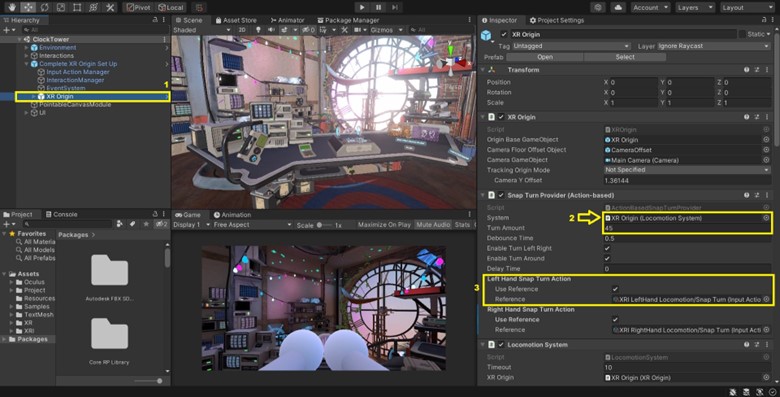
- For Snap Turning, Select XR Origin > Pass “XR Origin” as a reference to the “System” field > Set “Turn Amount” by default it is set to “45” > Check the “Use Reference” checkbox for relevant input >Pass reference of “XRI Hand Name Locomotion/Turn,” which is in “Assets > Samples > XR Interaction Toolkit > “Toolkit Version” > Starter Assets.”
- Test the project and experiment with rotation by flicking the thumb stick left and right.Here is the XRIT code for Snap Turning as a reference
using UnityEngine.InputSystem;
using UnityEngine.InputSystem.Controls;
using UnityEngine.XR.Interaction.Toolkit.Inputs;

namespace UnityEngine.XR.Interaction.Toolkit
{
    /// <summary>
    /// A locomotion provider that allows the user to rotate their rig using a 2D axis input
    /// from an input system action.
    /// </summary>
    [AddComponentMenu("XR/Locomotion/Snap Turn Provider (Action-based)", 11)]
    [HelpURL(XRHelpURLConstants.k_ActionBasedSnapTurnProvider)]
    public class ActionBasedSnapTurnProvider : SnapTurnProviderBase
    {
        [SerializeField]
        [Tooltip("The Input System Action that will be used to read Snap Turn data from the left hand controller. Must be a Value Vector2 Control.")]
        InputActionProperty m_LeftHandSnapTurnAction;
        /// <summary>
        /// The Input System Action that Unity uses to read Snap Turn data sent from the left hand controller. Must be a <see cref="InputActionType.Value"/> <see cref="Vector2Control"/> Control.
        /// </summary>
        public InputActionProperty leftHandSnapTurnAction
        {
            get => m_LeftHandSnapTurnAction;
            set => SetInputActionProperty(ref m_LeftHandSnapTurnAction, value);
        }

        [SerializeField]
        [Tooltip("The Input System Action that will be used to read Snap Turn data from the right hand controller. Must be a Value Vector2 Control.")]
        InputActionProperty m_RightHandSnapTurnAction;
        /// <summary>
        /// The Input System Action that Unity uses to read Snap Turn data sent from the right hand controller. Must be a <see cref="InputActionType.Value"/> <see cref="Vector2Control"/> Control.
        /// </summary>
        public InputActionProperty rightHandSnapTurnAction
        {
            get => m_RightHandSnapTurnAction;
            set => SetInputActionProperty(ref m_RightHandSnapTurnAction, value);
        }

        /// <summary>
        /// See .
        /// </summary>
        protected void OnEnable()
        {
            m_LeftHandSnapTurnAction.EnableDirectAction();
            m_RightHandSnapTurnAction.EnableDirectAction();
        }

        /// <summary>
        /// See <see cref="MonoBehaviour"/>.
        /// </summary>
        protected void OnDisable()
        {
            m_LeftHandSnapTurnAction.DisableDirectAction();
            m_RightHandSnapTurnAction.DisableDirectAction();
        }

        /// <inheritdoc />
        protected override Vector2 ReadInput()
        {
            var leftHandValue = m_LeftHandSnapTurnAction.action?.ReadValue<Vector2>() ?? Vector2.zero;
            var rightHandValue = m_RightHandSnapTurnAction.action?.ReadValue<Vector2>() ?? Vector2.zero;

            return leftHandValue + rightHandValue;
        }

        void SetInputActionProperty(ref InputActionProperty property, InputActionProperty value)
        {
            if (Application.isPlaying)
                property.DisableDirectAction();

            property = value;

            if (Application.isPlaying && isActiveAndEnabled)
                property.EnableDirectAction();
        }
    }
}
Direct Motion guide
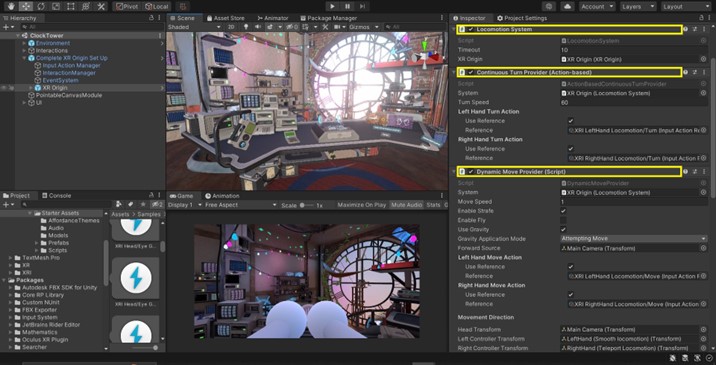
- For Direct Motion, make sure that the components of XR Origin — Locomotion System, Continuous Turn Provider, Dynamic Move Provider are added to the “XR Origin” with their respective properties..
- Test the project and try to move around the scene with direct motion using the left thumb stick.
Here is the XRIT code for Direct Motion as a reference
using Unity.XR.CoreUtils;
using UnityEngine.Assertions;

namespace UnityEngine.XR.Interaction.Toolkit.Samples.StarterAssets
{
    /// <summary>
    /// A version of action-based continuous movement that automatically controls the frame of reference that
    /// determines the forward direction of movement based on user preference for each hand.
    /// For example, can configure to use head relative movement for the left hand and controller relative movement for the right hand.
    /// </summary>
    public class DynamicMoveProvider : ActionBasedContinuousMoveProvider
    {
        /// <summary>
        /// Defines which transform the XR Origin's movement direction is relative to.
        /// </summary>
        /// <seealso cref="leftHandMovementDirection"/>
        /// <seealso cref="rightHandMovementDirection"/>
        public enum MovementDirection
        {
            /// <summary>
            /// Use the forward direction of the head (camera) as the forward direction of the XR Origin's movement.
            /// </summary>
            HeadRelative,

            /// <summary>
            /// Use the forward direction of the hand (controller) as the forward direction of the XR Origin's movement.
            /// </summary>
            HandRelative,
        }

        [Space, Header("Movement Direction")]
        [SerializeField]
        [Tooltip("Directs the XR Origin's movement when using the head-relative mode. If not set, will automatically find and use the XR Origin Camera.")]
        Transform m_HeadTransform;

        /// <summary>
        /// Directs the XR Origin's movement when using the head-relative mode. If not set, will automatically find and use the XR Origin Camera.
        /// </summary>
        public Transform headTransform
        {
            get => m_HeadTransform;
            set => m_HeadTransform = value;
        }

        [SerializeField]
        [Tooltip("Directs the XR Origin's movement when using the hand-relative mode with the left hand.")]
        Transform m_LeftControllerTransform;

        /// <summary>
        /// Directs the XR Origin's movement when using the hand-relative mode with the left hand.
        /// </summary>
        public Transform leftControllerTransform
        {
            get => m_LeftControllerTransform;
            set => m_LeftControllerTransform = value;
        }

        [SerializeField]
        [Tooltip("Directs the XR Origin's movement when using the hand-relative mode with the right hand.")]
        Transform m_RightControllerTransform;

        public Transform rightControllerTransform
        {
            get => m_RightControllerTransform;
            set => m_RightControllerTransform = value;
        }

        [SerializeField]
        [Tooltip("Whether to use the specified head transform or left controller transform to direct the XR Origin's movement for the left hand.")]
        MovementDirection m_LeftHandMovementDirection;

        /// <summary>
        /// Whether to use the specified head transform or controller transform to direct the XR Origin's movement for the left hand.
        /// </summary>
        ///
        public MovementDirection leftHandMovementDirection
        {
            get => m_LeftHandMovementDirection;
            set => m_LeftHandMovementDirection = value;
        }

        [SerializeField]
        [Tooltip("Whether to use the specified head transform or right controller transform to direct the XR Origin's movement for the right hand.")]
        MovementDirection m_RightHandMovementDirection;

        /// <summary>
        /// Whether to use the specified head transform or controller transform to direct the XR Origin's movement for the right hand.
        /// </summary>
        /// <seealso cref="MovementDirection"/>
        public MovementDirection rightHandMovementDirection
        {
            get => m_RightHandMovementDirection;
            set => m_RightHandMovementDirection = value;
        }

        Transform m_CombinedTransform;
        Pose m_LeftMovementPose = Pose.identity;
        Pose m_RightMovementPose = Pose.identity;

        /// <inheritdoc />
        protected override void Awake()
        {
            base.Awake();

            m_CombinedTransform = new GameObject("[Dynamic Move Provider] Combined Forward Source").transform;
            m_CombinedTransform.SetParent(transform, false);
            m_CombinedTransform.localPosition = Vector3.zero;
            m_CombinedTransform.localRotation = Quaternion.identity;

            forwardSource = m_CombinedTransform;
        }

        /// <inheritdoc />
        protected override Vector3 ComputeDesiredMove(Vector2 input)
        {
            // Don't need to do anything if the total input is zero.
            // This is the same check as the base method.
            if (input == Vector2.zero)
                return Vector3.zero;

            // Initialize the Head Transform if necessary, getting the Camera from XR Origin
            if (m_HeadTransform == null)
            {
                var xrOrigin = system.xrOrigin;
                if (xrOrigin != null)
                {
                    var xrCamera = xrOrigin.Camera;
                    if (xrCamera != null)
                        m_HeadTransform = xrCamera.transform;
                }
            }

            // Get the forward source for the left hand input
            switch (m_LeftHandMovementDirection)
            {
                case MovementDirection.HeadRelative:
                    if (m_HeadTransform != null)
                        m_LeftMovementPose = m_HeadTransform.GetWorldPose();

                    break;

                case MovementDirection.HandRelative:
                    if (m_LeftControllerTransform != null)
                        m_LeftMovementPose = m_LeftControllerTransform.GetWorldPose();

                    break;

                default:
                    Assert.IsTrue(false, $"Unhandled {nameof(MovementDirection)}={m_LeftHandMovementDirection}");
                    break;
            }

            // Get the forward source for the right hand input
            switch (m_RightHandMovementDirection)
            {
                case MovementDirection.HeadRelative:
                    if (m_HeadTransform != null)
                        m_RightMovementPose = m_HeadTransform.GetWorldPose();

                    break;

                case MovementDirection.HandRelative:
                    if (m_RightControllerTransform != null)
                        m_RightMovementPose = m_RightControllerTransform.GetWorldPose();

                    break;

                default:
                    Assert.IsTrue(false, $"Unhandled {nameof(MovementDirection)}={m_RightHandMovementDirection}");
                    break;
            }

            // Combine the two poses into the forward source based on the magnitude of input
            var leftHandValue = leftHandMoveAction.action?.ReadValue() ?? Vector2.zero;
            var rightHandValue = rightHandMoveAction.action?.ReadValue() ?? Vector2.zero;

            var totalSqrMagnitude = leftHandValue.sqrMagnitude + rightHandValue.sqrMagnitude;
            var leftHandBlend = 0.5f;
            if (totalSqrMagnitude > Mathf.Epsilon)
                leftHandBlend = leftHandValue.sqrMagnitude / totalSqrMagnitude;

            var combinedPosition = Vector3.Lerp(m_RightMovementPose.position, m_LeftMovementPose.position, leftHandBlend);
            var combinedRotation = Quaternion.Slerp(m_RightMovementPose.rotation, m_LeftMovementPose.rotation, leftHandBlend);
            m_CombinedTransform.SetPositionAndRotation(combinedPosition, combinedRotation);

            return base.ComputeDesiredMove(input);
        }
    }
}
Teleportation guide
- For Teleportation, Add the component “Teleportation Provider” to “XR Origin” > Pass “XR Origin” as a reference to the “System Field.”
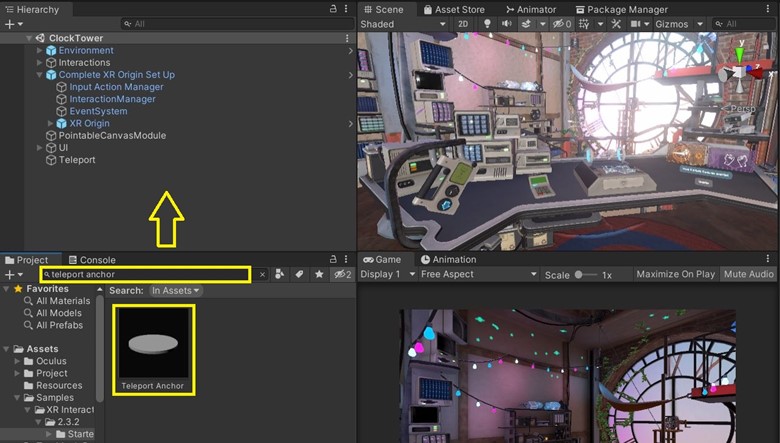
- Search for “Teleport Anchor” in the Project window > Add the prefab to the scene.
- Duplicate the prefabs and place them around the scene. Set the name of the prefab as the assigned position and set the direction in which the camera will be facing after the teleportation.
- Test the teleportation mode by flicking the right hand thumb stick in the forward direction to aim and release the thumb stick to teleport.

Here is the XRIT code for Teleportation as a reference
using UnityEngine.Assertions;

namespace UnityEngine.XR.Interaction.Toolkit
{
    /// <summary>
    /// The <see cref="TeleportationProvider"/> is responsible for moving the XR Origin
    /// to the desired location on the user's request.
    /// </summary>
    [AddComponentMenu("XR/Locomotion/Teleportation Provider", 11)]
    [HelpURL(XRHelpURLConstants.k_TeleportationProvider)]
    public class TeleportationProvider : LocomotionProvider
    {
        /// <summary>
        /// The current teleportation request.
        /// </summary>
        protected TeleportRequest currentRequest { get; set; }

        /// <summary>
        /// Whether the current teleportation request is valid.
        /// </summary>
        protected bool validRequest { get; set; }

        [SerializeField]
        [Tooltip("The time (in seconds) to delay the teleportation once it is activated.")]
        float m_DelayTime;

        /// <summary>
        /// The time (in seconds) to delay the teleportation once it is activated.
        /// This delay can be used, for example, as time to set a tunneling vignette effect as a VR comfort option.
        /// </summary>
        public float delayTime
        {
            get => m_DelayTime;
            set => m_DelayTime = value;
        }

        /// <summary>
        /// This function will queue a teleportation request within the provider.
        /// </summary>
        ///The teleportation request to queue.
        /// Returns  if successfully queued. Otherwise, returns .
        public virtual bool QueueTeleportRequest(TeleportRequest teleportRequest)
        {
            currentRequest = teleportRequest;
            validRequest = true;
            return true;
        }

        bool m_HasExclusiveLocomotion;
        float m_TimeStarted = -1f;

        /// <inheritdoc />
        protected override void Awake()
        {
            base.Awake();
            if (system != null && m_DelayTime > 0f && m_DelayTime > system.timeout)
                Debug.LogWarning($"Delay Time ({m_DelayTime}) is longer than the Locomotion System's Timeout ({system.timeout}).", this);
        }

        /// <summary>
        /// See <see cref="MonoBehaviour"/>.
        /// </summary>
        protected virtual void Update()
        {
            if (!validRequest)
            {
                locomotionPhase = LocomotionPhase.Idle;
                return;
            }

            if (!m_HasExclusiveLocomotion)
            {
                if (!BeginLocomotion())
                    return;

                m_HasExclusiveLocomotion = true;
                locomotionPhase = LocomotionPhase.Started;
                m_TimeStarted = Time.time;
            }

            // Wait for configured Delay Time
            if (m_DelayTime > 0f && Time.time - m_TimeStarted < m_DelayTime)
                return;

            locomotionPhase = LocomotionPhase.Moving;

            var xrOrigin = system.xrOrigin;
            if (xrOrigin != null)
            {
                switch (currentRequest.matchOrientation)
                {
                    case MatchOrientation.WorldSpaceUp:
                        xrOrigin.MatchOriginUp(Vector3.up);
                        break;
                    case MatchOrientation.TargetUp:
                        xrOrigin.MatchOriginUp(currentRequest.destinationRotation * Vector3.up);
                        break;
                    case MatchOrientation.TargetUpAndForward:
                        xrOrigin.MatchOriginUpCameraForward(currentRequest.destinationRotation * Vector3.up, currentRequest.destinationRotation * Vector3.forward);
                        break;
                    case MatchOrientation.None:
                        // Change nothing. Maintain current origin rotation.
                        break;
                    default:
                        Assert.IsTrue(false, $"Unhandled {nameof(MatchOrientation)}={currentRequest.matchOrientation}.");
                        break;
                }

                var heightAdjustment = xrOrigin.Origin.transform.up * xrOrigin.CameraInOriginSpaceHeight;

                var cameraDestination = currentRequest.destinationPosition + heightAdjustment;

                xrOrigin.MoveCameraToWorldLocation(cameraDestination);
            }

            EndLocomotion();
            m_HasExclusiveLocomotion = false;
            validRequest = false;
            locomotionPhase = LocomotionPhase.Done;
        }
    }
}
Oculus Integration Toolkit
Oculus Integration adds interactions like ray, poke, locomotion, and grab for controllers, hands, and controllers as hands. Each interaction is designed to be modular and work in simple and complex VR applications. The Oculus Interaction Toolkit also has features just for hands, including hand-specific interactions, pose and gesture detection, and debug visuals.
Steps for Oculus Integration Toolkit (Snap Turning and Direct Motion)
- Download First Hand on GitHub and open it in Unity Editor.
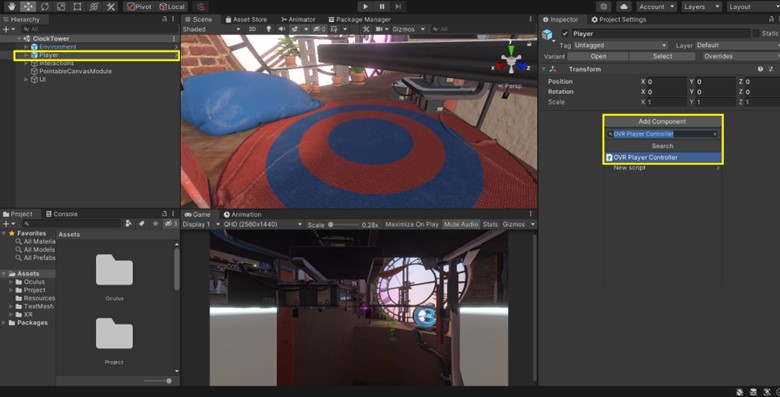
- Select “Player Rig” and “Add a component.”
- Select “OVRPlayerController”. It is inside Asset > Oculus > VR > Scripts > Util.
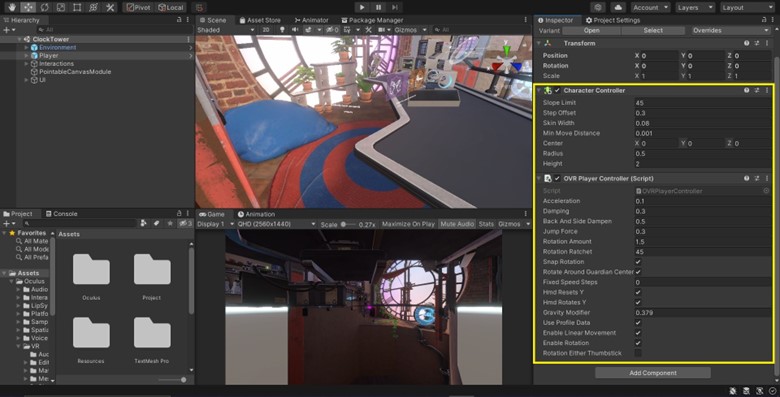
- Make sure that the required components (“Character Controller and “OVRPlayerController” script) are added to the “Player” with their respective properties.
- Test the project by moving move around the scene with direct motion using the left thumb stick and flicking the thumb stick to use snap turning.
Call to Action for Developers
To enhance accessibility in VR experiences, it’s important for developers to implement multiple locomotion styles. By offering options like teleportation, free locomotion, and snap turning, developers can accommodate users with different needs and preferences. Embracing these inclusive design principles not only promotes accessibility but also improves the overall user experience in virtual reality.
Additionally, be aware that users may not have access to one or both controllers. Therefore, developers may want to go beyond locomotion options and consider multiple ways to engage those methods.
Provide alternative input methods, such as gaze-based interactions or voice commands. These ensure that more people can fully participate and navigate within the virtual environment. Let’s create VR experiences that are welcoming, functional, and enjoyable for everyone.
Watch the Video Presentation
Acknowledgments
We would like to thank adXR for giving us feedback and improving this article. We also thank Thomas Logan, Dylan Fox, Meryl Evans, and Kenji Yanagawa for helping me with the article by improving it and making it more accessible.
Virtual Reality (VR) Accessibility Consulting Services
Our years of experience working with virtual reality and being speakers on the topic have given us a unique perspective when it comes to consulting on VR projects. If you’d like to innovate in the accessibility of VR please, please contact us to discuss how we can help you.
