Summary
Closed captions provide another way for people to get audio information in various media formats, such as movies and TV shows. Captions are essential to ensure that dialogue, sound effects, and music are accessible to people who are deaf or hard of hearing. This holds true in virtual reality (VR), where captions enhance the accessibility of games, social worlds, and other immersive experiences.
Additionally, out of the 7.5 million who use subtitles, 6 million did not have a hearing disability per a BBC article referencing OfCom’s data. Hence, many people benefit from captions. Nonetheless, it’s important to remember that people who are deaf or hard of hearing depend on captions.
Displaying captions in immersive VR environments can be more challenging than in two-dimensional formats such as movies and TV. This is because the viewer is not always focused on a fixed point such as a screen. They often have the freedom to move and explore in a three-dimensional (3D) space. This makes the positioning of captions an important consideration.
Existing VR games and applications approach caption positioning in different ways. For instance, the puzzle game Esper 2 positions captions in 3D space, usually near points of interest in a contextual manner. On the other hand, games like Half-Life: Alyx use headlocked captions, where the captions are positioned relative to the player’s gaze. The effectiveness of different caption placement methods may vary depending on the specific play style of a game.
Meta has nine Virtual Reality Checks (VRCs) in their developer documentation to enhance accessibility for VR applications published in the Meta Quest App Store. VRC.Quest.Accessibility.1 states “Application should be playable in its entirety without the use of audio, or provide subtitle options for in-application dialogue and/or sound effects to communicate progress to the user.”
Although Meta has provided this VRC as a recommendation, their documentation does not provide examples or code to show how to implement this VRC. This article will show you how to do this in Unity using an open-source package called Chirp published by XR Access.
New to Virtual Reality Development?
If you’re new to virtual reality development and want to dive into Unity, here are some resources to help. These guide you through learning about application programming interfaces (API) and setting up the development environment. Here are two useful software development kits (SDK) to get started.
- XR Integration Toolkit
- Installation of XR Interaction Toolkit: Official documentation by Unity
- Easy Unity VR Tutorial for Beginners: Unofficial documentation that is easier to follow.
- Oculus Integration Toolkit
- Get Started with Oculus in Unity: Official documentation by Meta
How to Implement Captions
This shows how to add captions to an existing VR application that does not have caption support by default. It uses Oculus’s Whisperer, which is an open-source example project from Meta.
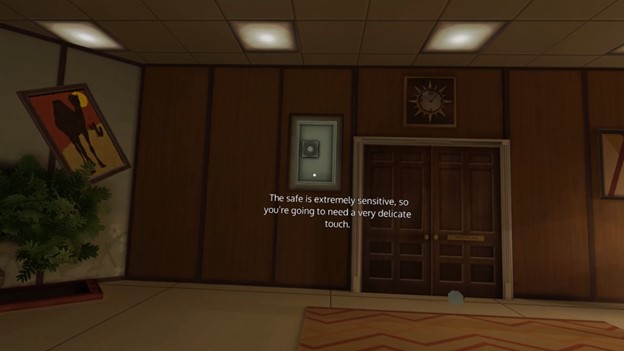
Whisperer is a game where the player plays a ghost who has magical powers to change the environment by using their voice. Whisperer features a narrator who guides the player through the game. However, since the game does not have captions, it is not accessible to a person who is deaf or hard of hearing.

Here are the steps on how to implement captions in Whisperer using XR Access’s Chirp. This is an open-source caption system for VR applications made with Unity.
Set up Whisperer
- To use the Whisperer project, clone the Whisperer project from GitHub to a local folder. Download a zip file of the repository from GitHub or use the following command:
> git clone https://github.com/oculus-samples/voicesdk-samples-whisperer.git - Use Unity Hub to open the Whisperer project folder with the correct Unity version (2021.3.11f1 at the time of writing this article). Follow the prompts to install this exact version for the best results.
Install the Chirp Unity package
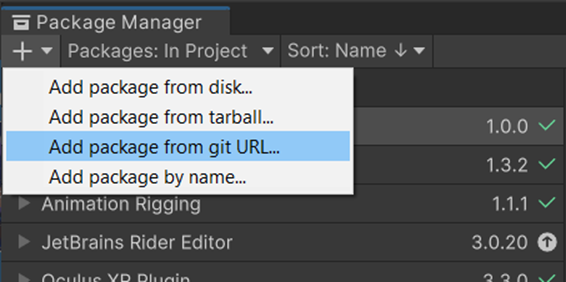
- The Chirp caption system is available as a Unity package on GitHub. In the Unity editor where you have Whisperer open, navigate to Window > Package Manager > Add (Plus symbol) > Add package from git URL.

- Enter the following git URL and press Add.
> https://github.com/XR-Access-Initiative/chirp-captions.git - If you run into any issues with adding the package, refer to Unity’s official documentation on how to install packages from a git URL.
Overview of the Chirp caption system
After successfully installing the Chirp package, there will be a folder called “Chirp Captions” in the “Packages” folder of the Whisperer project. To get started, go to Chirp Captions > Runtime > Prefabs to access a prefab called “ChirpCaptions” to use.
The prefab contains two scripts that are attached to it:
- CaptionSystem
- CaptionRenderManager
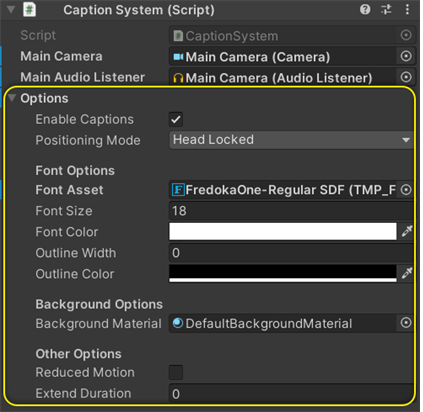
CaptionSystem is the main script to focus on. It contains various options — such as font size and color — which you can use to tweak how captions appear.
Another important component of Chirp is the CaptionSource script. This script must be added to any GameObject with an AudioSource component attached, for which you also want captions.
To trigger a caption from this CaptionSource, you have to call a public method on this script such as ShowTimedCaption(), similar to how you would call PlayOneShot() on an AudioSource. CaptionSource also has a few options that you can adjust such as the Source Label which lets you identify speakers from captions.
Set up the caption system
- Open Assets > Whisper > Scenes and open the Loader scene.
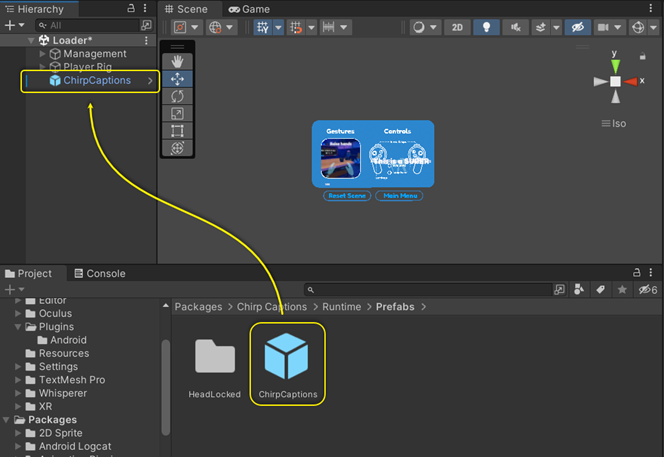
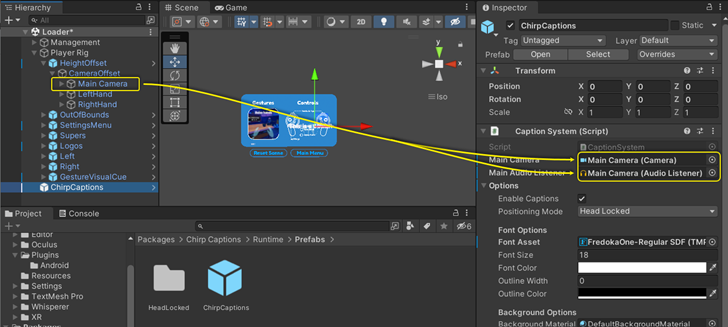
- From Packages > Chirp Captions > Runtime > Prefabs, locate the prefab called ChirpCaptions. Drag this into the hierarchy of the Loader scene.
- The captioning system has to have a reference to your main Camera component. Drag the GameObject containing the Main Camera and AudioListener components (from Player Rig > HeightOffset > CameraOffset > Main Camera in the hierarchy) into the public fields called “Main Camera” and “Main Audio Listener” in the CaptionSystem script attached to the ChirpCaptions prefab.
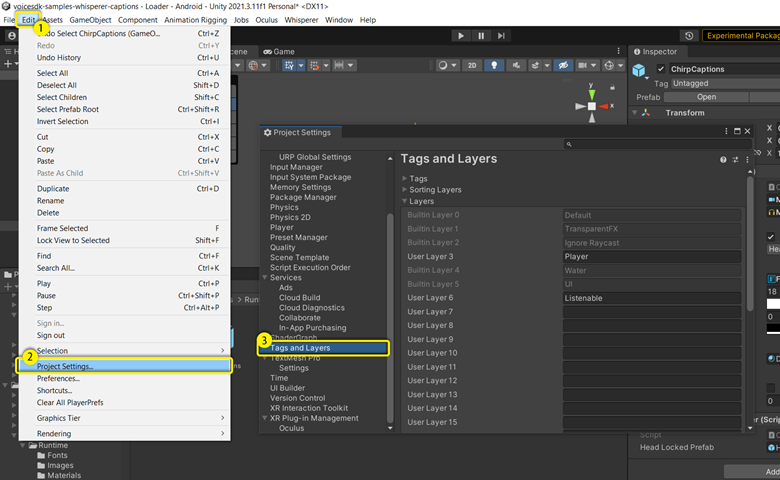
- The captioning system renders captions on a separate layer to ensure that captions are on top. This layer has to be manually created in the project after importing the caption system package. To create a new layer for captions, go to Edit > Project Settings, then select the Tags and Layers category.
- Create a new layer called “Captions” in one of the empty User Layers.

Understanding Whisperer’s project structure
In Whisperer, you’ll add captions corresponding to the narrator’s voice lines. First, find out where Whisperer stores the audio files for the narrator’s voice lines, and how they are triggered in the game.
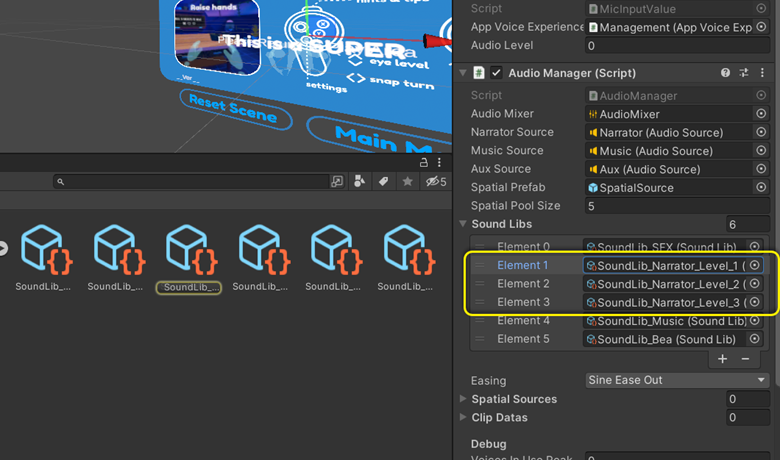
In the main Loader scene, we see a GameObject called Audio. This has an attached script called AudioManager, which contains a reference to an AudioSource for the narrator and 3 different narrator SoundLib assets for each level of the game.
On inspecting a SoundLib asset, you’ll see that it is a ScriptableObject containing clip data references for each of the narrator’s voice lines. Voice lines are stored as audio clips, which are played from the narrator’s AudioSource. In the AudioManager script, you’ll see a public method called Play() that other game scripts use to cue voice lines.
Integrate Chirp with Whisperer’s existing structure
Since captions closely correspond to audio information in the game, you’ll need to make the audio playback systems and captioning system work together. There are two things to do.
First, every AudioSource that needs corresponding captions must also have a CaptionSource script as a sibling.
Second, whenever a method is used to play an audio clip from that AudioSource, a method must also be called on CaptionSource to display the corresponding caption text. Chirp has ShowTimedCaption(), which takes a caption text and duration as parameters.
To add caption support, we can extend the existing setup that Whisperer uses to store and play back audio clips, and add some custom code to handle caption data.
Add a CaptionSource
Follow these steps to add a CaptionSource for the narrator’s AudioSource.
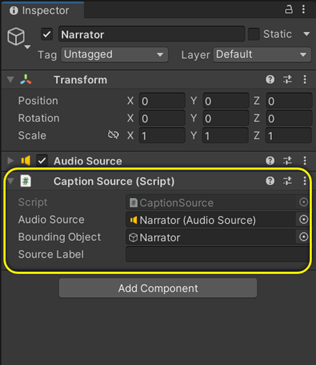
- In Whisperer’s Loader scene hierarchy, you can find the narrator’s AudioSource component under Management > Audio > Narrator. Add a CaptionSource script by activating Add Component button.
- Upon adding the CaptionSource script, its Audio Source and Bounding Object public fields will populate automatically. In the inspector, optionally you can assign a Source Label for the caption source, which will display a speaker identifier when captions are displayed.
Store caption data
Chirp can receive caption lines as strings, along with the duration for which each line should be displayed. Each audio clip can have a caption string associated with it, which is shown for the same duration as the clip is played. However, this approach becomes impractical for longer audio clips because the text would be too lengthy to fit on the screen and be legible. Therefore, the text needs to be divided into multiple lines that are displayed one after the other.
You can use existing subtitle formats like SubRip (SRT) to define the lines of captions along with their timing information. This lets you use external software like Subtitle Edit to create SRT files that are synchronized with the audio clip while following Captioning Key guidelines to ensure that captions are accessible. These caption files can be imported into Unity as TextAssets that you can use in your application.
Note: Unity does not support directly importing SRT files. However, if you generate an .srt file and rename it to .txt, Unity can import it as a TextAsset.
Extend Whisperer’s audio scripts
In Whisperer, you will create SRT captions for each audio clip. Then you can use the existing SoundLib script to store caption data alongside audio clip data. Subsequently, you can extend the functionality of AudioManager to read these captions and trigger them using Chirp whenever an audio clip is played. Here’s how to do this.
- Open the base script called SoundLib.cs that determines the functionality of the SoundLib ScriptableObject. This is located under Assets > Whisperer > Scripts > Audio.
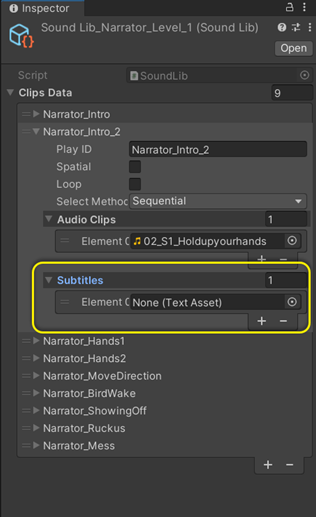
- You can see that this script contains a class called ClipData which has a List<AudioClip> called AudioClips. Since you want to store subtitle files as TextAssets corresponding to each AudioClip, add a new data structure of type List<TextAsset> to ClipData:
public List<TextAsset> Subtitles; - Inspect Assets > Whisperer > Audio > SoundLib_narrator_level_1.asset and, you will see that each of them contain a new list for captions under Clips Data. Here, you can assign a TextAsset for each of the narrator’s voice lines.
Here’s how you can extract individual caption lines and their duration information from the SRT-encoded TextAssets and display them using Chirp at the right time. To parse SRT files within Unity, use Unity-Simple-SRT created by the GitHub user roguecode.
- Download the SRTParser.cs script. You only need this script to parse SRT, not the entire repository. Place the downloaded script inside the Assets folder of Whisperer. To stay organized, put it under Assets > Whisperer > Scripts > Audio.
- Enclose the two classes inside SRTParser.cs with a namespace. Call this namespace “SimpleSRT” to import this script inside of AudioManager, where you will parse the SRT data. (See our modified SRTParser.cs for a reference of how to do this).
- Open the AudioManager.cs script located under Assets > Whisperer > Scripts > Audio. In this script, import the SimpleSRT and XRAccess.Chirp namespaces. Also, import the System.Linq namespace to make it easier to do list operations:
using System.Linq; using SimpleSRT; using XRAccess.Chirp; - Since you need to display subtitles whenever an audio clip is played, write a new method called PlaySubtitles() that will be called along with every Play() call for an audio clip. Before writing this method, first determine where in the code this method can be invoked. In the Play() method within AudioManager.cs, we can see that audio clips for the narrator are played with the following code:
_narratorSource.PlayOneShot(clipData.AudioClip, clipData.Volume);Add the code for displaying a subtitle just before this line as follows:
int index = clipData.AudioClips.FindIndex(a => a == clipData.AudioClip);
if (clipData.Subtitles.ElementAtOrDefault(index) != null)
{
    var subtitles = SRTParser.Load(clipData.Subtitles[index]);
    StartCoroutine(PlaySubtitles(subtitles, _narratorSource));
}
PlaySubtitles() can be written as a coroutine that loops through a list of subtitle lines and displays them at the correct time:
private IEnumerator PlaySubtitles(List<SubtitleBlock> subtitles, AudioSource audioSource){
            if (subtitles == null || subtitles.Count == 0 || CaptionSystem.Instance == null)
            {
                  yield break;
            }

            float startTime = Time.time;
            float elapsedTime = 0f;

            CaptionSource source = audioSource.GetComponent<CaptionSource>();

            foreach (var subtitle in subtitles)
            {
                  float duration = (float)subtitle.Length;

                  while (elapsedTime < subtitle.From)
                  {
                  elapsedTime = Time.time - startTime;
                  yield return null;
                  }
                  source.ShowTimedCaption(subtitle.Text, duration);
            }
      }
With this, you have integrated captions into the Whisperer project. Whenever an audio clip is played for the narrator, a corresponding caption will also be displayed by the Chirp caption system. Now, here’s a look at the options that Chirp provides that lets you adjust how these captions appear.
Adjust caption options
Chirp lets you adjust many parameters to change how captions appear in the Unity application. Two categories of options are available in the system. The first category contains options that are common to the entire caption system. This includes aspects like font type, color, and size. These options can be accessed from the CaptionSystem script.
The second category contains options specific to the selected caption positioning mode. These can be accessed from the prefab specific to the positioning mode from the CaptionRenderManager script.
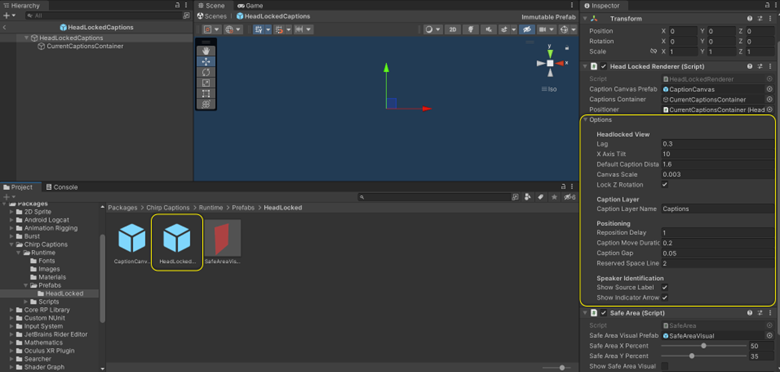
At the time of this writing, Chirp only supports headlocked positioning, so this section allows you to adjust aspects like the delay with which captions follow the user’s gaze and the distance at which the captions appear from the user’s head. For a full overview of different parameters and what they do, take a look at Chirp’s documentation.
Caption options can be set in the Editor using the inspector or during runtime via a script. Therefore, you can create an in-game user interface (UI) that enables users to adjust the caption appearance to their liking. See SubtitlesUI.cs for an example implementation of a caption settings UI.
Generate captions from audio files
Adding captions to an existing game can be a labor-intensive task, especially when it involves creating caption files with precise timing for audio tracks. Manually transcribing audio files and setting up their timing can be a painstaking and time-consuming process. Fortunately, there are software solutions that can automate some or all of these tasks to make the process more efficient.
You can use speech-recognition software like OpenAI’s Whisper to transcribe audio. Whisper is a free and open-source model that can work completely offline, running locally on our machines. Buzz is a convenient graphical user interface (GUI) for Whisper to make it easier to use. Buzz can export transcribed audio files in an SRT format to use in the captioning system.
Test the captioning system
Now that you’ve integrated the captioning system into Whisperer, test it to see how it works. Before doing this, verify the caption files corresponding to each audio clip are assigned in the SoundLib assets.
- Generate SRT files for each of the narrator’s voice lines located in Assets > Whisperer > Audio > Narrator, or download the pre-generated files. These files can be generated using a transcribing software of your preference. (See above.) Ensure the timings of the generated file are accurate and the formatting follows Captioning Key guidelines. Change the extension of the generated files from .srt to .txt so that they can be imported into Unity as a TextAsset. Place these .txt files in a subfolder inside the Assets folder in the Whisperer project.
- In Assets > Whisperer > Audio, locate the three SoundLib assets that start with SoundLib_Narrator. Open these in the inspector and assign the caption files that you generated that correspond to each audio clip.
- Follow the steps given in Whisperer’s GitHub readme to configure the project correctly.
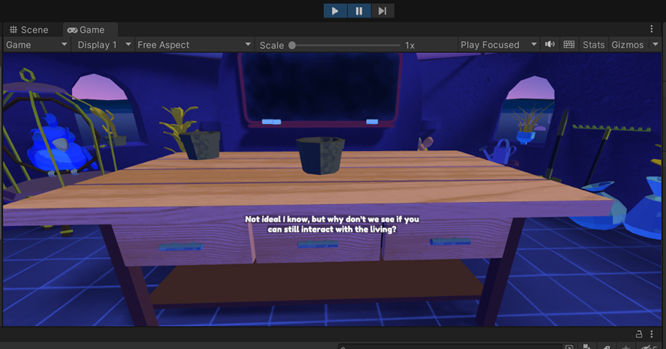
- Play the game using the Play mode in Unity Editor. If everything works, the splash screen appears. After agreeing to the terms on the first screen, the audio from the narrator’s first lines play and the corresponding captions appear.
- Click the mouse button and drag it to move the camera around. The headlocked captions will follow your gaze.
- You can also connect your VR headset and enter Play mode or install a build of the game in your headset to experience captions in VR.
Summary
Captions play a vital role in making audio information accessible to individuals who are deaf or hard of hearing. This includes the immersive world of VR. Displaying captions in VR environments presents unique challenges due to the differences in how a user experiences an immersive 3D world compared to 2D formats like movies. The best practices for displaying and positioning captions in immersive environments are still emerging.
In VRC.Quest.Accessibility.1, Meta emphasizes the importance of captions in creating accessible VR applications and provides guidelines for implementing them. This article works through an example implementation of this VRC by using XR Access’s Chirp caption system, an open-source package for VR captions in Unity.
While Chirp currently only supports one way of positioning captions, it is an open-source project that can make it easier for more developers to implement basic caption support in their VR applications. It also allows them the possibility of customization and even potential contributions to future development.
Watch the Video Presentation
Acknowledgments
We would like to thank adXR for giving us feedback and improving this article. Also, thanks to Thomas Logan, Dylan Fox, Meryl Evans, and Kenji Yanagawa for helping with reviewing the captions and the article.
Virtual Reality (VR) Accessibility Consulting Services
Our years of experience working with virtual reality and being speakers on the topic have given us a unique perspective when it comes to consulting on VR projects. If you’d like to innovate in the accessibility of VR please, please contact us to discuss how we can help you.

It was a great article. I have two follow up questions.
Question1: what ml model is being used by CHIRP to transcribe the text?
Question2: Can I use this for live transcription? to my understanding the current version only supports transcription from audio clips.
The current version does not have support for live transcription, but this could be a good future addition.