Summary
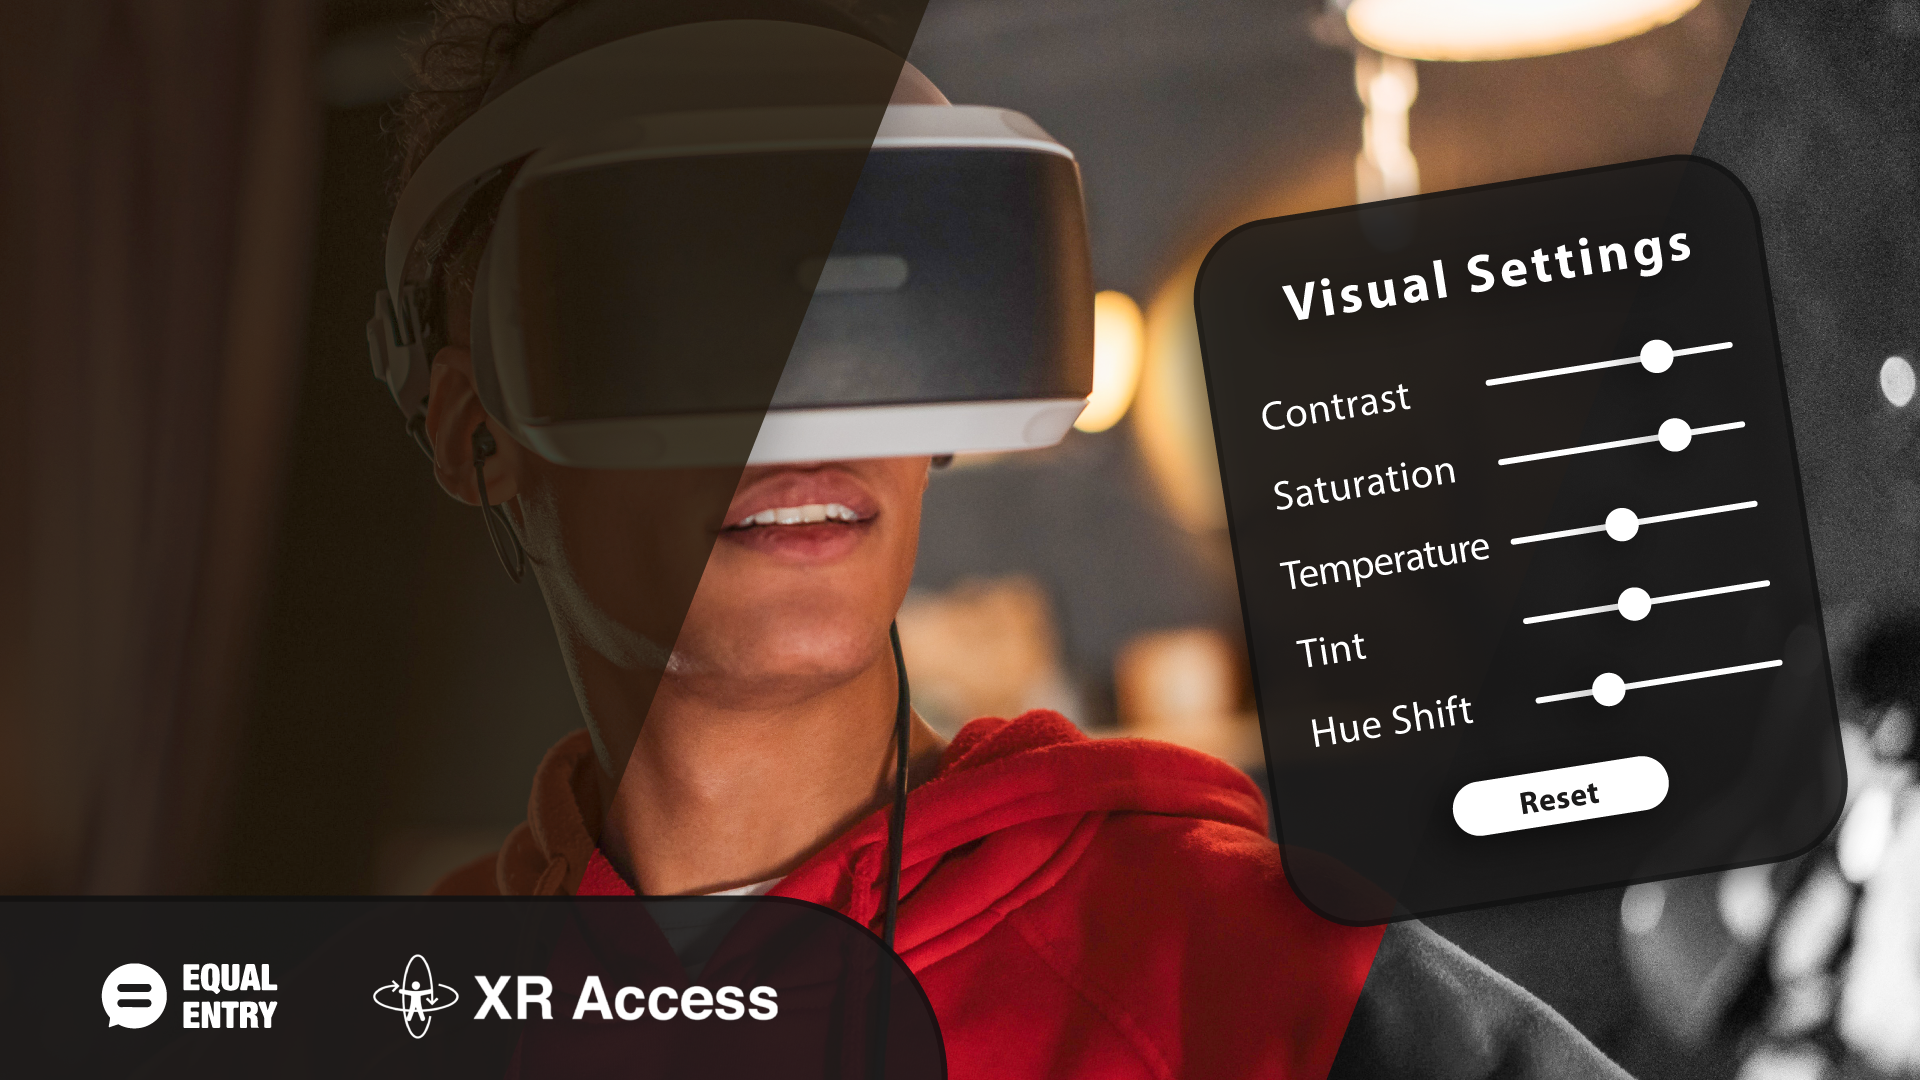
Meta has nine accessibility Virtual Reality Checks (VRC) for creating accessible virtual reality (VR) experiences for people with disabilities. This looks at Accessibility VCR.Accessibility.5, which focuses on providing users with the ability to adjust display settings such as contrast, saturation, temperature, hue shift, and tint to accommodate their visual needs. This article will help developers incorporate this into their VR applications to ensure a more inclusive user experience.
Before diving in, you can try the demo and view the source code.
New to Virtual Reality Development?
If you’re new to virtual reality development and want to dive into Unity, here are some resources to help. These guide you through learning about application programming interfaces (API) and setting up the development environment. Here are two useful software development kits (SDK) to get started.
- XR Integration Toolkit
- Installation of XR Interaction Toolkit: Official documentation by Unity
- Easy Unity VR Tutorial for Beginners: Unofficial documentation that is easier to follow.
- Oculus Integration Toolkit
- Get Started with Oculus in Unity: Official documentation by Meta
How to Implement VRC.Accessibility.5
This takes you through the process to implement display settings for accessible VR. It looks at the implementation of VRC5 on Meta’s First Hand Application.
![]()
- Download the First Hand Project and open it in Unity’s editor. This demo uses Unity version 2021.3.21f1. (We recommend using this on 2021 version of Unity.)
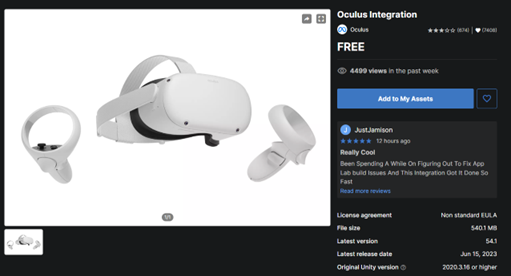
- Add the Oculus Integration package (Make sure you log in with the same email ID you use in Unity) to your project by activating Add to My Assets.

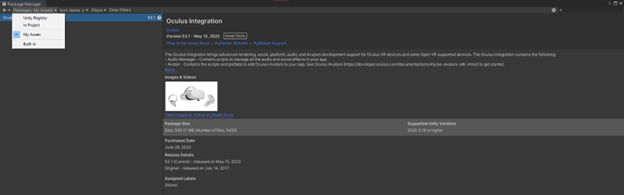
- Return to Unity editor and go to Window > Package manager.
- In the package manager, select packages and “My Assets.”
- Activate the Import button.
- Import all the packages by leaving the checkboxes all checked.
- Confirm the added package is current by verifying there are no updates displayed on screen.
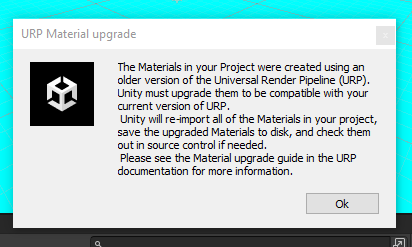
- If the Project shows the following pop up after opening, select “Ok” to upgrade to the current version of URP.
Add app display settings to First Hand Project
These steps show you how to enable visual features such as contrast, saturation, hue, temperature, and tint using post processing.
Note that this setup has been tested and works on URP-based projects and the features are implemented using post processing effects. (If the project is not based on universal rendering pipeline, then there are other resources and references provided at the end of this article for implementing VRC5.)
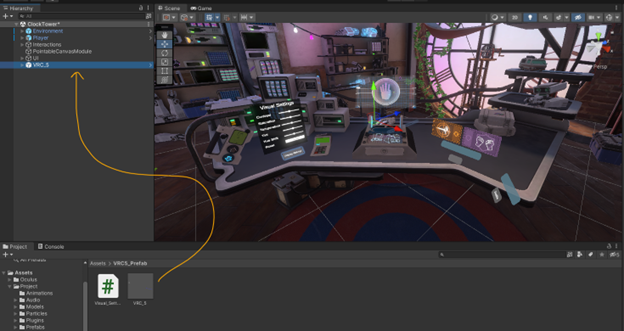
- 1. In the Unity editor, open Assets/Projects/Scences/ClockTower.unity.
It displays the TMP Importer pop up. Select “Import TMP Essentials” and “Import TMP Examples & Extras” and close the dialog. - Download the VRC-5 Prefab and paste the folder into the “Assets” folder of the project.
- Open the VRC_5 prefab folder and drag and drop the VRC_5.prefab into the Hierarchy window. This adds the in-app settings to change the visual options.
- Expand the VRC_5 prefab and select GameObject named “Global Volume.”
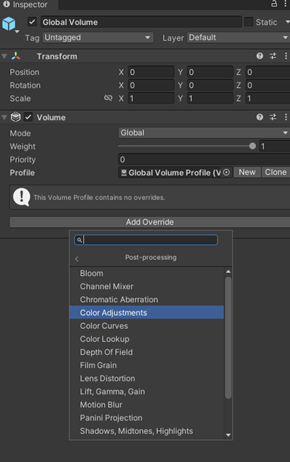
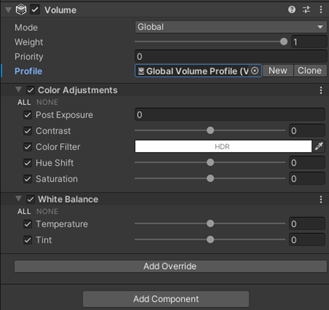
In the inspector window, Expand the Volume component and activate the “New” button present in the Profile section of the volume component. - Select add overrides and add “Color Adjustments.”
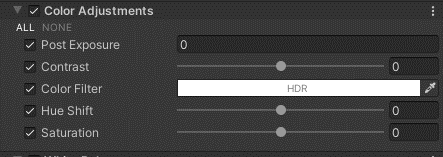
- Check ALL the options present.
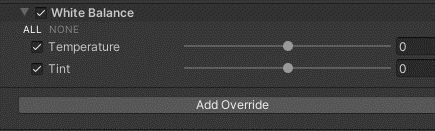
- Similarly, select “Add Override” and add “White Balance” settings present in the post processing and check the box “Temperature” and “Tint.”
- Confirm the inspector editor looks like the following image.
- Now, you should be able to run the application and change the appearance of the application from the sliders at runtime.


 This adds the in-app settings to change the visual options.
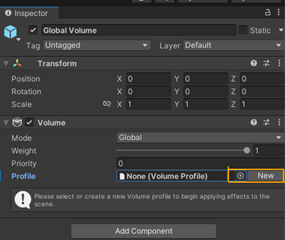
Connect the user interface elements for the VRC5 prefab
- Enable the hand ray interaction by expanding the GameObject called “UIHelpers” in the hierarchy.
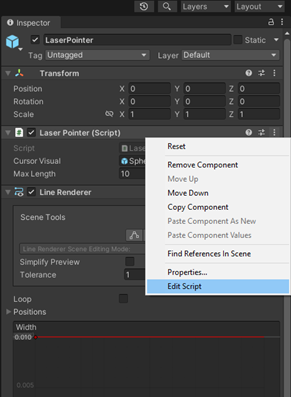
- Select “LaserPointer” in the UIHelpers. In the Inspector, select the three dots at the top right corner of the laser pointer script and select “Edit Script.”
- Enter [SerializeField] above line private LaserBeamBehavior _laserBeamBehavior ( line 39) and save the script (CTRL+S).
- Return to the LaserPointer inspector in the unity editor.In the Laser point script select the Laser Beam behavior from the drop down as “On When Hit Target.” Refer to the following image for reference.
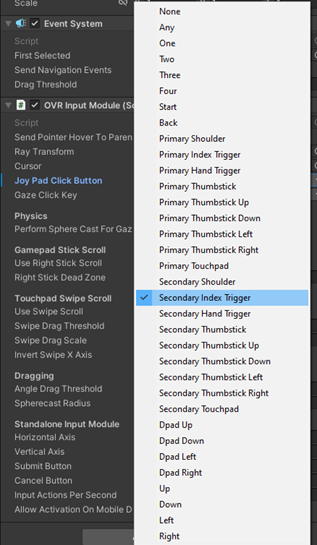
- Select “EventSystem” present under the UIHelpers in the hierarchy. On the inspector side, expand the “OVR Input Module (Script)” and from the drop down present for the “Joy Pad Click Button” select “Secondary Index Trigger.”This lets you interact with the display settings with a ray coming out from your right hand.
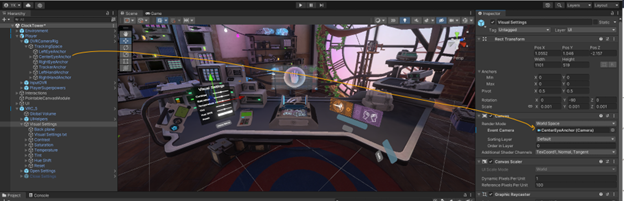
- Select the visual settings present in the hierarchy and drag and drop the CenterEyeAnchor from the hierarchy to the event camera field as shown in the following image. CenterEyeAnchor is located at Player>OVRCameraRig>TrackingSpace>CenterEyeAnchor
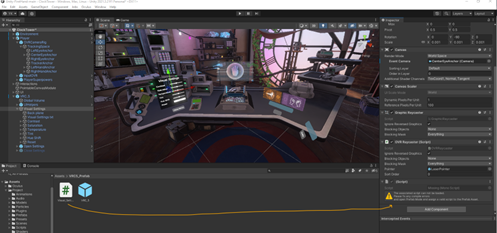
- Drag and drop the visual setting script present in the VRC_5 prefab folder (Assets>VRC5_prefab) to the inspector window of the visual setting component. Refer the below figure for reference.
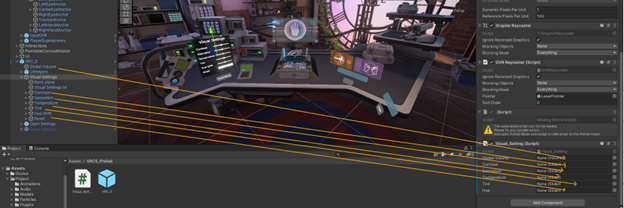
- Drag and Drop the components (Contrast,Saturation,Temperature,Tint,Hue Shift and Reset) from the hierarchy to the visual setting script added in step 16. Add Global volume to global volume field, contrast to the contrast slider field and so on as marked in the following image.
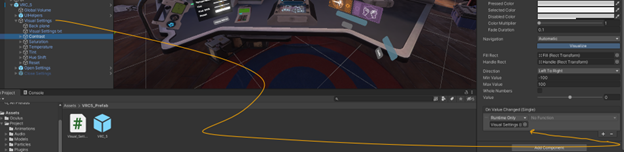
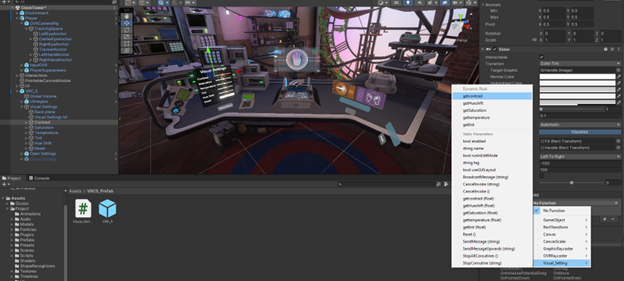
- To link the functions present in the visual setting script to the sliders select the contrast entity present in the hierarchy and drag and drop the Visual settings component (Parent of the contrast) to the on value changed field present in the inspector under the slider component. Refer to the next image.
- Select the drop down no function present in the OnValueChanged(single) and click on Visual settings and select “getContrast” function. This links the function to the slider.
- Follow steps ?? and ?? for all other entities (Contrast, Saturation, Temperature, Tint, Hue Shift, and Reset) and link the respective functions to the UI. The below table will help you link the respective function to its respective slider element.
Contrast getContrast Saturation getSaturation Temperature getTemperature Tint gettint Hue Shift getHueshift Reset Reset()
![Add [SterilizedFiled] to code](https://equalentry.com/wp-content/uploads/2023/07/add-SerializedField-to-code.png)

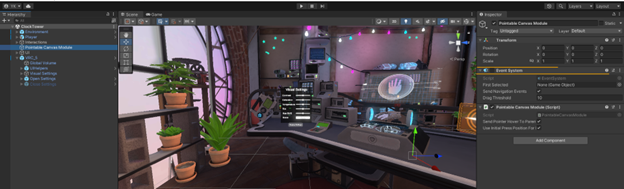
And that’s it. Kudos! Attach your headset to the system and enjoy the application. If you want to build the APK and flash the application in your headset, make sure to turn off the Event systems present in the Pointable Canvas Module (present in the unity hierarchy) before making a build. This event system interferes with the event system of the UI helpers.
How to verify VRC5 settings
The following lists the steps to test the VRC5 settings to check they’re working and shows what it looks like before and after.
- Launch the title.
- Go to Display settings.
- Confirm that you can change the brightness and contrast.
Users should be able to adjust in-application brightness and contrast per their preferences into the unity editor as well as with the in-app display setting.
How Do the VRC5 Settings Help Accessibility?
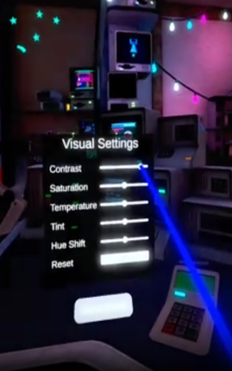
VCR5 provides guidelines for adjusting the display settings to let users control the visibility of the application. These settings include contrast, saturation, and hue shift. After implementing VRC5, here’s what each setting looks like before and after.
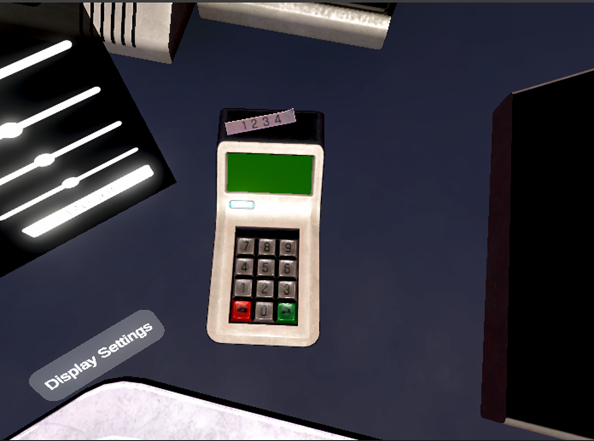
Contrast
Giving users a way to change contrast helps make the applications more visible. Providing contrast options enhances the accessibility of VR applications in the following ways:
- Improves object and user interface visibility
- Improves text legibility
- Improves environmental awareness
- Reduces eye strain
- Provides customization
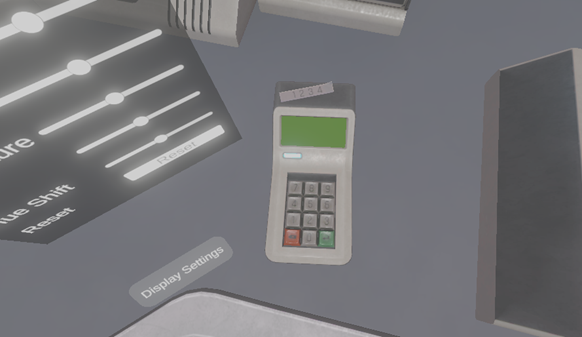
The following images show the difference in using contrast. The first image has no or low contrast. The calculator’s digits are barely visible. Applying the contrast settings increases the visibility of the digits on the calculator.
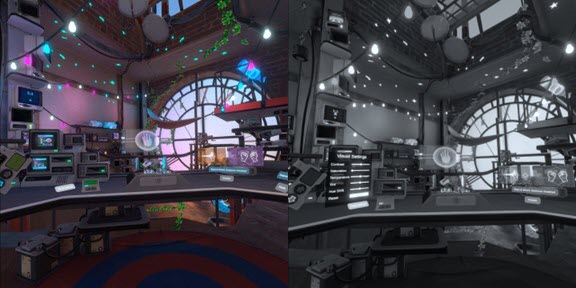
Saturation
Achromatopsia is a condition characterized by a partial or total absence of color vision. People with complete achromatopsia cannot perceive colors. They only see black, white, and shades of gray. Lowering the saturation values to -100 causes the application to convert to grayscale to enhance accessibility.
Testing with a grayscale user interface enables you to test your own application to see if it uses color to communicate information. This can be used to assist with validating if your application meets the Use of color Web Content Accessibility Guidelines success criterion.
Changing saturation enhances the accessibility of applications in VR in the following ways:
- Differentiates visuals
- Enhances color perception
- Improves visual clarity and readability
- Improves environmental perception
- Provides customization
By providing the option to modify saturation levels during VR application design and development, developers can improve accessibility and create a more inclusive and enjoyable VR experience for a variety of users.
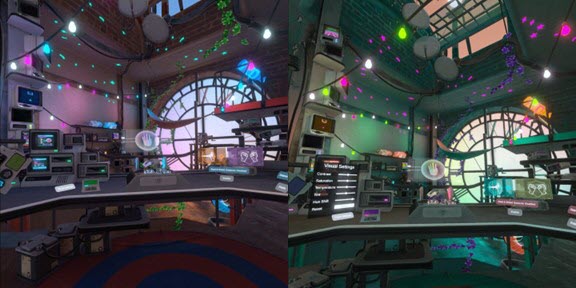
Hue shift
People who are colorblind can benefit from hue shift. Color blindness is a condition that affects the ability to perceive or differentiate certain colors. By using hue shift in VR applications, developers can enhance color differentiation to improve the experience for people who are colorblind.
Here are some different types of color blindness and how hue shift can help:
- Protanopia: People with protanopia perceive red as more green and duller. By shifting the hue of certain red tones towards more distinguishable hues, such as orange or pink, people with protanopia can better differentiate red objects from other colors.
- Deuteranopia: People with deuteranopia see green as red. Adjusting the hue of green tones can help them differentiate green objects from other colors.
- Tritanopia: People with tritanopia can’t tell the difference between purple and red, blue and green, and yellow and pink. While hue shift may not be as effective for tritanopia, it’s possible to adjust other color aspects, such as contrast and brightness, to make colors more distinguishable.
Changing hue shift enhances the accessibility of applications in VR in the following ways:
- Enhances color contrast
- Highlights important elements
- Provides customization
By carefully adjusting the hue and other color parameters in VR applications, developers can create greater contrast and differentiation between color combinations. This allows people who are colorblind to better perceive and distinguish colors within the application.
Changing the temperature and tint in VR applications can enhance accessibility for people with visual disabilities. Here’s how these adjustments can help:
Color perception enhancement: People with colorblindness or vision disabilities may perceive specific colors differently. By adjusting the temperature and tint, developers can modify the color balance and color cast in the VR environment. This helps people differentiate between colors that might otherwise appear similar.
Personalized visual experience: Temperature and tint adjustments allow users to customize the visual experience in VR according to their preferences. Some may have personal preferences for warmer or cooler color tones. They may require specific color temperature adjustments for improved visibility and comfort. These customization options in VR applications allow people to make changes based on their color preferences and accessibility requirements.
Environmental immersion: Changing the temperature and tint can create specific environmental effects in VR applications. For example, adjusting the temperature to a warm tone can simulate a sunny environment, while applying a cool tint can create a cold or icy atmosphere. These modifications enhance the immersion and realism of the VR experience, making it more engaging.
Visual comfort and fatigue reduction: People with vision disabilities or conditions may find certain color temperatures or tints more comfortable for extended VR use. Allowing them to adjust the temperature and tint based on their comfort levels can help reduce eye strain and discomfort, which creates a more accessible and enjoyable VR experience.
By offering customizable temperature and tint settings within VR applications, developers can provide users with greater control over their visual experience. They can adjust colors and tones according to their preferences and visual needs. This enhances the accessibility and inclusiveness of VR applications for individuals with varying visual disabilities and preferences.
Conclusion
This article discusses the importance of accessibility in VR applications, including the use of contrast, saturation, temperature, and hue shift to enhance visibility and meet diverse user preferences and needs. Additionally, it delves into the implementation of post-processing effects, accessing and modifying values, and utilizing UI sliders to control and customize settings in real-time.
Creating inclusive and immersive experiences requires considering the unique requirements of users, such as those with color blindness. By taking advantage of the power of XR technology, developers can help build a more accessible and engaging future.
Future Scope
- Alternate options to sliders: Sliders are a common way to adjust app settings, but they can be difficult to use for people with limited dexterity. Alternate options, such as +/- buttons, could be implemented to make it easier for everyone to adjust game settings.
- Ability to change the color of a particular object: Currently, most apps change the colors of the entire scene when accessibility features are enabled. This can be disorienting for some players. A better solution would be to allow players to change the color of a particular object, such as the player character or the text.
- Moveable in-app display menu: The in-app display menu is currently fixed at a particular position in the game. This can be inconvenient for players who are unable to reach the menu. A better solution would be to make the menu moveable along with the user, or to add it to one of the buttons on the controller.
Additionally, allow players to adjust the font size and contrast of the in-game text.
Watch the Video
Acknowledgments
We would like to thank adXR for giving us feedback and improving this article. Further, I would like to thank Thomas Logan, Dylan Fox, Meryl Evans, and Kenji Yanagawa for helping me with the article by improving it and making it more accessible.
Virtual Reality (VR) Accessibility Consulting Services
Our years of experience working with virtual reality and being speakers on the topic have given us a unique perspective when it comes to consulting on VR projects. If you’d like to innovate in the accessibility of VR please, please contact us to discuss how we can help you.
