Summary
In virtual reality (VR), users can look around and interact with 3D objects inside a virtual world by wearing a headset and holding two hand controllers. Often, you have to physically turn your head to enjoy various experiences.
However, not everyone can physically move their head. With snap turning, users can use their hand controller to virtually adjust their view without physically turning their heads.
This video demonstrates the two ways of looking around in virtual reality. The first is to physically turn the head in the direction of what you want to see. The second is using the thumbstick.
Meta defined nine accessibility Virtual Reality Checks (VRC) to improve access to virtual reality for people with disabilities. VRC.Quest.Accessibility.7 states “Applications should provide the user with the option to rotate their view without physically moving their head/neck.”
Although it is just a recommendation, all virtual reality applications should have this. Meta’s VRC documentation only says what should be achieved, but not how. So, this shows you how to implement it.
Possible Solutions for VRC7, Rotating View
Here are the four potential solutions for complying with VRC7.
- Snap turning: Requires a hand controller.
- Gaze control: Requires slight head movement.
- Voice control: Does not require physical movement.
- Eye tracking control: Does not require physical movement.
Solution 1: Snap turning is the simplest to implement as covered here. However, this solution requires a hand. One hand control is covered in VRC4 but no hands control is not covered in Meta VRCs.
There needs to be another VRC to ensure that virtual reality applications are accessible without hand controllers. There are three other options, although these are outside the scope of VRC7.
Solution 2: Gaze control can drastically minimize the amount of physical head movement. The user can gaze at a user interface element and activate a button to rotate their view.
Solution 3: Voice control allows for voice commands such as, “Look to the right” and then the screen virtually turns their head. Oculus Voice SDK can achieve this.
Solution 4: Eye tracking. The eye tracker is only available in Quest Pro or Vive Pro Eye and requires more research.
New To Virtual Reality Development?
If you want to try virtual reality development on Unity, here are resources to help you. Try these to learn about APIs and setting up the development environment. Here are two useful software development kits (SDK) to get started.
- XR Interaction Toolkit (XRIT) by Unity
- Installation of XR Interaction Toolkit: Official documentation from Unity
- Easy Unity VR Tutorial for Beginners: Not official documentation from Unity, but it’s best for beginners.
- Oculus Integration Toolkit from Meta
- Get Started with Oculus in Unity: Official documentation from Meta
How to Implement Snap Turning
The implementation varies depending on the SDK that you use to build your virtual reality experience. This will show you the way with the XR Interaction Toolkit (XRIT) from Unity and Oculus Integration Toolkit from Meta. These steps should help you do the same as long as you are using one of these SDKs.
To better show the steps, we picked several virtual reality application examples. These are open-source projects from Oculus Samples on GitHub from Meta.
Whisperer already has this feature. First Hand does not. To implement it on an existing project, download First Hand and follow these steps. Visit Equal Entry’s VRC7 – First Hand GitHub repository to see our fixed code. If you like to just try the experience, download Equal Entry’s First Hand APK to your Quest.
When implementing snap turning, you must consider the appropriate angle for your use case. In Oculus Integration Toolkit, this angle is called “rotation angle.” In the XR Integration Toolkit, it is called “turn amount. The default angle is 45 degrees. However, you should consider your individual experience to determine the appropriate angle.
Design tradeoff is the number of times the user has to push the thumbstick versus how much fidelity they need in the virtual environment to actively target objects or maneuver in the environment. Here is the table of how many times you would have to push the thumbstick to look behind based on the rotation angle.
| Degrees | Number of pushes |
|---|---|
| 15 | 12 |
| 30 | 6 |
| 45 | 4 |
Oculus Integration Toolkit
The First Hand Meta page says, “First Hand is an official Hand Tracking demo built by Meta. Experience the magic of interacting with the virtual world directly with your hands. Use switches, levers, and virtual UIs as you solve puzzles to build robotic gloves, and then experience their superpowers.”
Although it is designed to work without hand controllers, it also works with hand controllers. Follow the steps below to implement snap turning using this sample.
Steps for Oculus Integration Toolkit (First Hand)
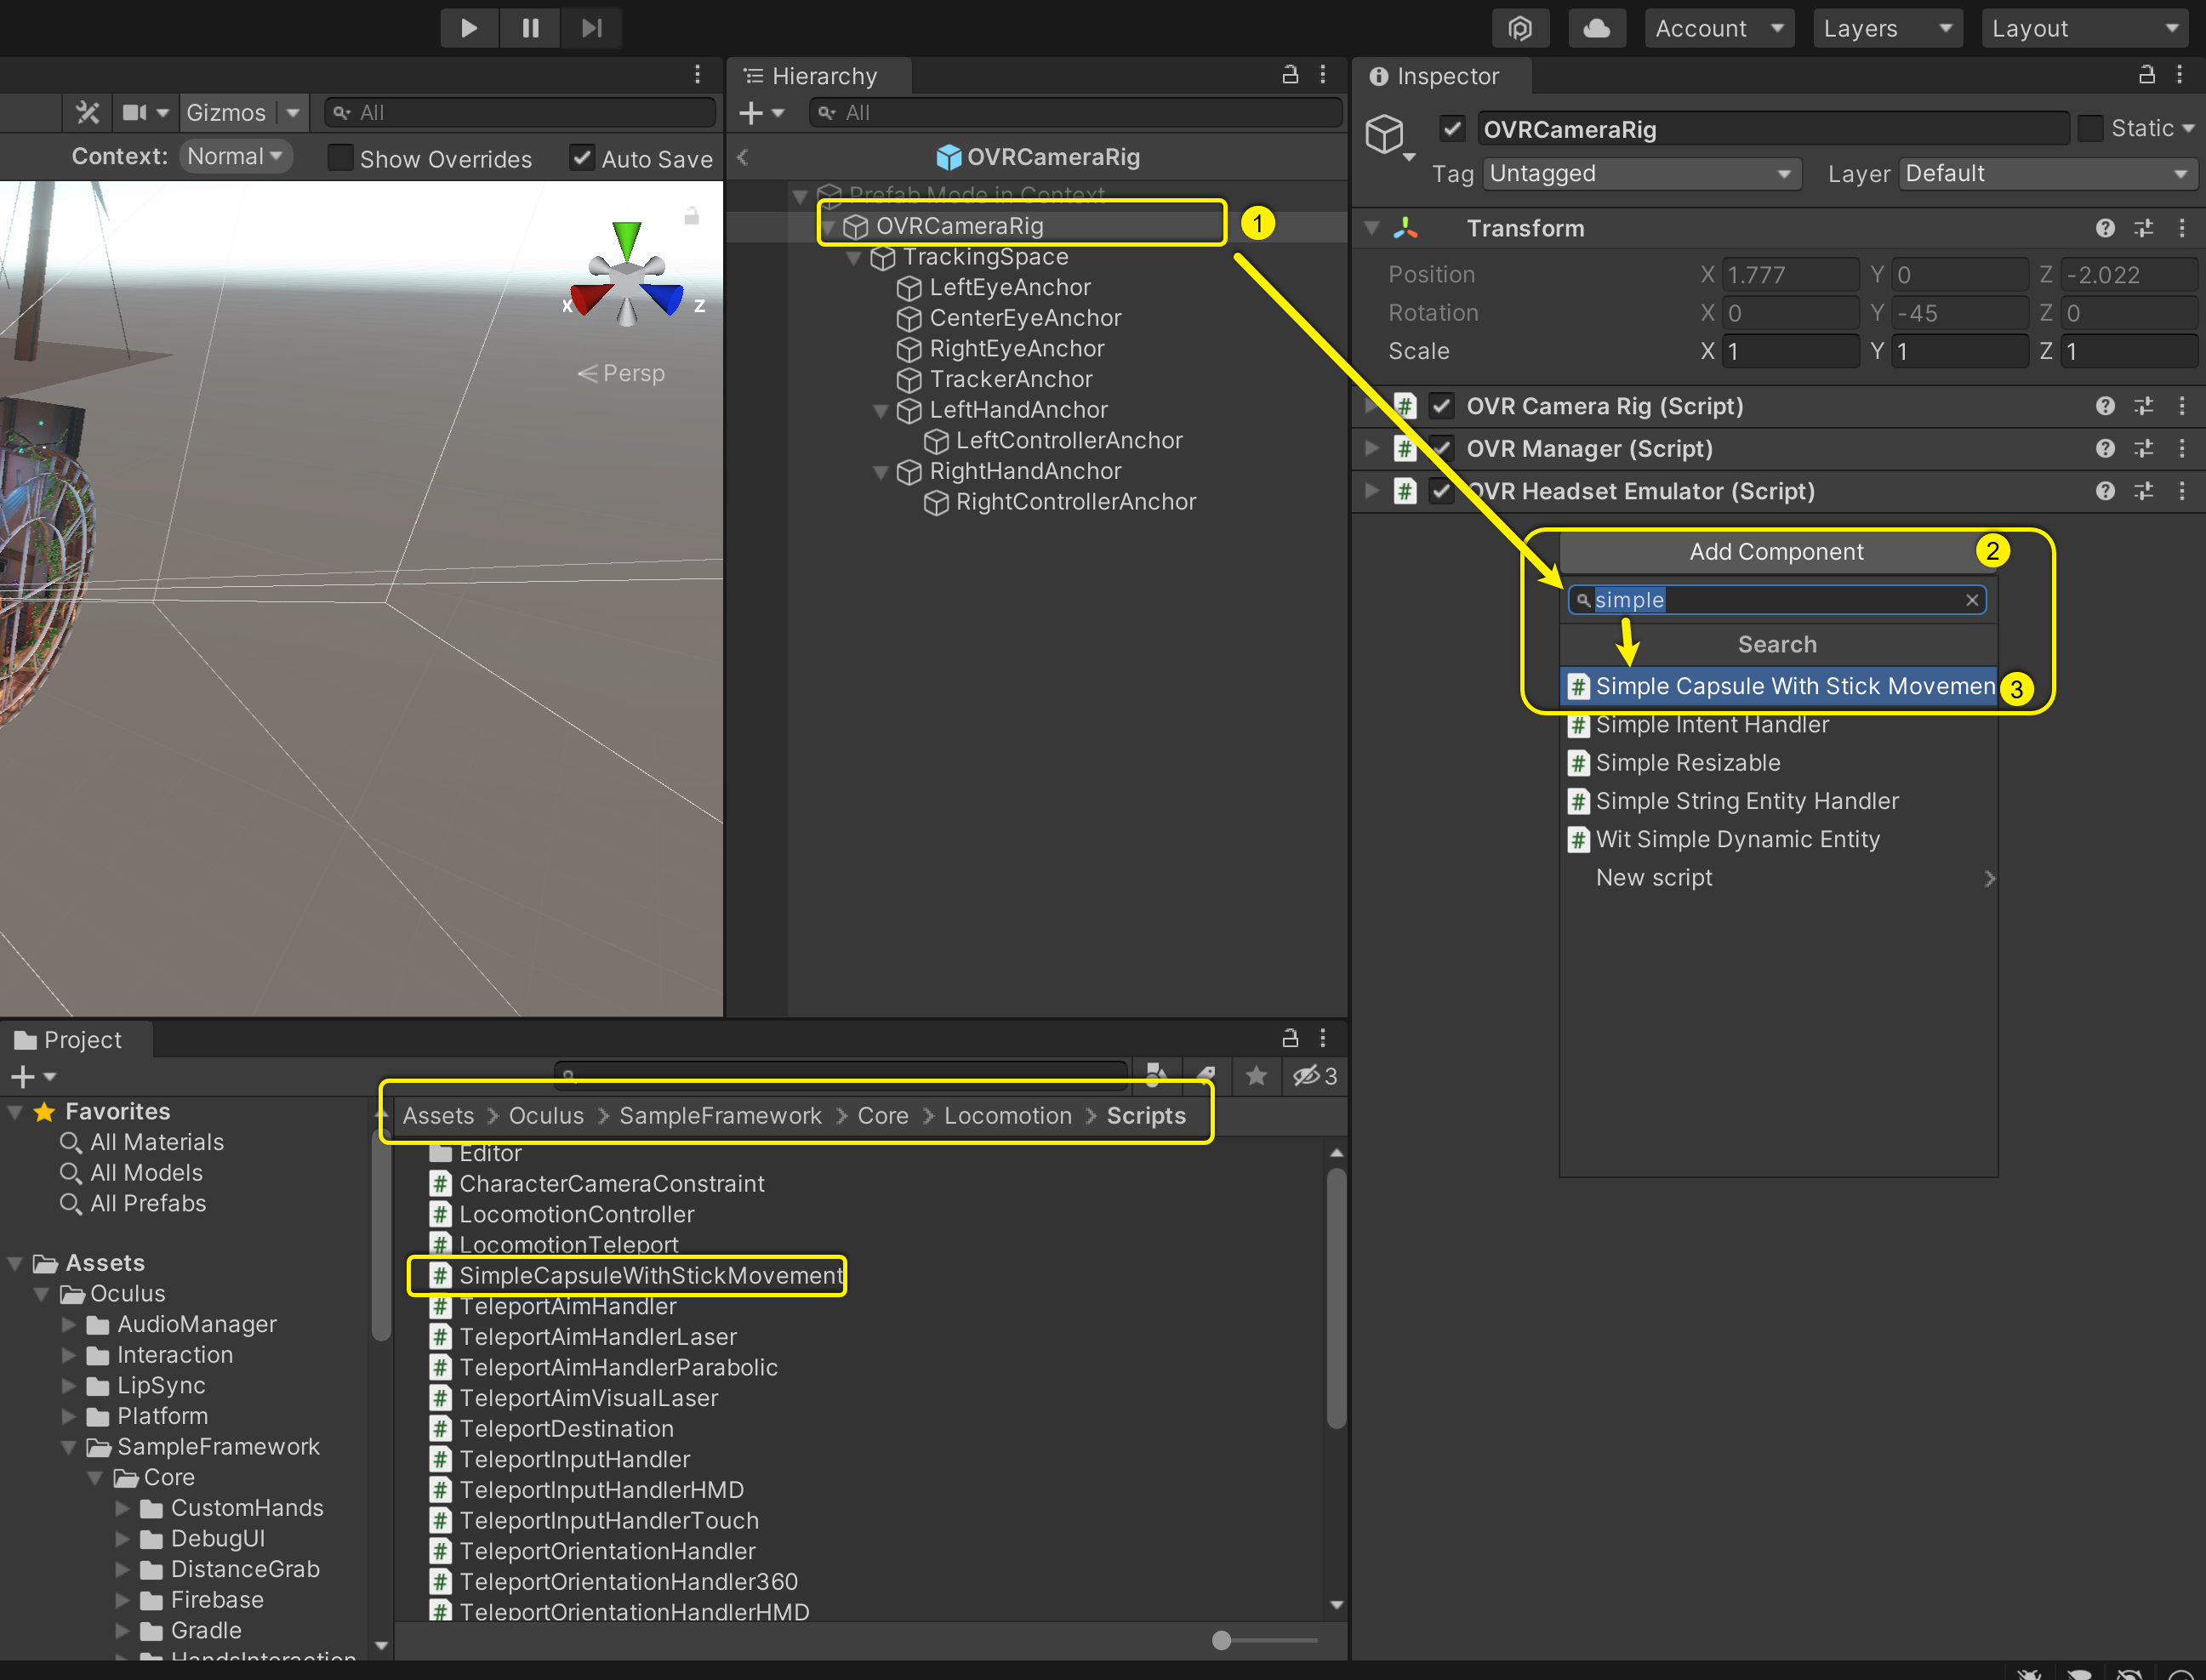
- Download First Hand on GitHub and open it in Unity Editor.
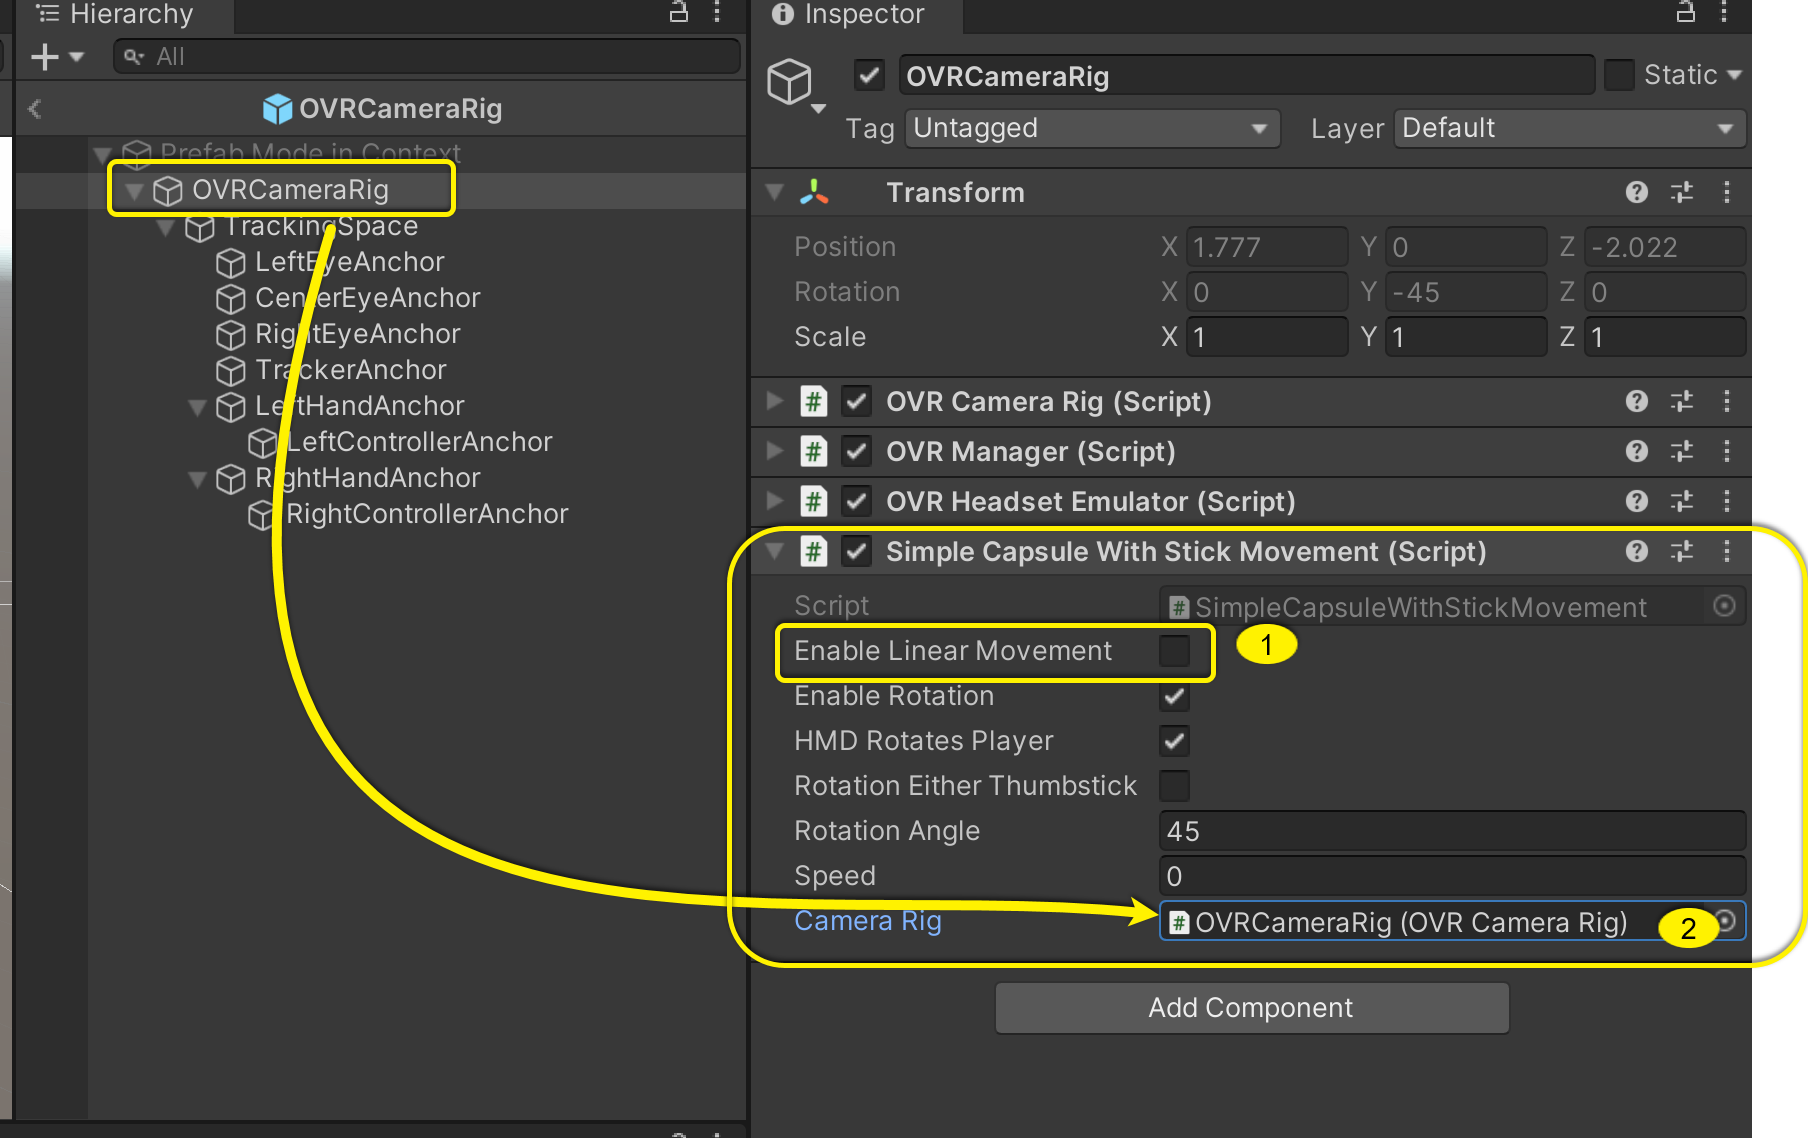
- Select “OVRCameraRig” > Add component “Simple Capsule with Stick Movement,” which is inside Oculus > SampleFramework > Core > Locomotion > Script.

- Uncheck the “Enable Linear Movement” checkbox.
- Pass the “OVRCamera Rig” to the “Camera Rig” field inside “Simple Capsule with Stick Movement.”
The First Hand code
This is a script from the Occulus integration toolkit. Note: We have not add any custom code and are using a script simply provided by this SDK
using System.Collections;
using System.Collections.Generic;
using System;
using UnityEngine;

public class SimpleCapsuleWithStickMovement : MonoBehaviour
{
    public bool EnableLinearMovement = true;
    public bool EnableRotation = true;
    public bool HMDRotatesPlayer = true;
    public bool RotationEitherThumbstick = false;
    public float RotationAngle = 45.0f; // The angle is defined here.
    public float Speed = 0.0f;
    public OVRCameraRig CameraRig;

    private bool ReadyToSnapTurn;
    private Rigidbody _rigidbody;

    public event Action CameraUpdated;
    public event Action PreCharacterMove;

    private void Awake()
    {
        _rigidbody = GetComponent <Rigidbody>();
        if (CameraRig == null) CameraRig = GetComponentInChildren <OVRCameraRig>();
    }

    void Start ()
    {

    }

    private void FixedUpdate()
    {
        if (CameraUpdated != null) CameraUpdated();
        if (PreCharacterMove != null) PreCharacterMove();

        if (HMDRotatesPlayer) RotatePlayerToHMD();
        if (EnableLinearMovement) StickMovement();
        if (EnableRotation) SnapTurn();
    }

    void RotatePlayerToHMD()
    {
        Transform root = CameraRig.trackingSpace;
        Transform centerEye = CameraRig.centerEyeAnchor;

        Vector3 prevPos = root.position;
        Quaternion prevRot = root.rotation;

        transform.rotation = Quaternion.Euler(0.0f, centerEye.rotation.eulerAngles.y, 0.0f);

        root.position = prevPos;
        root.rotation = prevRot;
    }

    void StickMovement()
    {
        Quaternion ort = CameraRig.centerEyeAnchor.rotation;
        Vector3 ortEuler = ort.eulerAngles;
        ortEuler.z = ortEuler.x = 0f;
        ort = Quaternion.Euler(ortEuler);

        Vector3 moveDir = Vector3.zero;
        Vector2 primaryAxis = OVRInput.Get(OVRInput.Axis2D.PrimaryThumbstick);
        moveDir += ort * (primaryAxis.x * Vector3.right);
        moveDir += ort * (primaryAxis.y * Vector3.forward);
        //_rigidbody.MovePosition(_rigidbody.transform.position + moveDir * Speed * Time.fixedDeltaTime);
        _rigidbody.MovePosition(_rigidbody.position + moveDir * Speed * Time.fixedDeltaTime);
    }

    void SnapTurn()
    {
        if (OVRInput.Get(OVRInput.Button.SecondaryThumbstickLeft) ||
            (RotationEitherThumbstick && OVRInput.Get(OVRInput.Button.PrimaryThumbstickLeft)))
        {
            if (ReadyToSnapTurn)
            {
                ReadyToSnapTurn = false;
                transform.RotateAround(CameraRig.centerEyeAnchor.position, Vector3.up, -RotationAngle);
            }
        }
        else if (OVRInput.Get(OVRInput.Button.SecondaryThumbstickRight) ||
            (RotationEitherThumbstick && OVRInput.Get(OVRInput.Button.PrimaryThumbstickRight)))
        {
            if (ReadyToSnapTurn)
            {
                ReadyToSnapTurn = false;
                transform.RotateAround(CameraRig.centerEyeAnchor.position, Vector3.up, RotationAngle);
            }
        }
        else
        {
            ReadyToSnapTurn = true;
        }
    }
}
XR Interaction Toolkit (XRIT)
XR Interaction Toolkit (XRIT) is an SDK developed by Unity. In this SDK, use a locomotion provider called Snap Turn Provider from Unity.

This is a game to play with voice commands. Player becomes a ghost and moves objects around using only their voice. In addition to the OpenXR and XRIT, this game uses Wit.AI to enable voice commands.
Steps for XRIT (Whisperer)
-
- Download Whisperer on GitHub and open it in Unity Editor
- Make sure the “XR Interaction toolkit” is imported into the project.
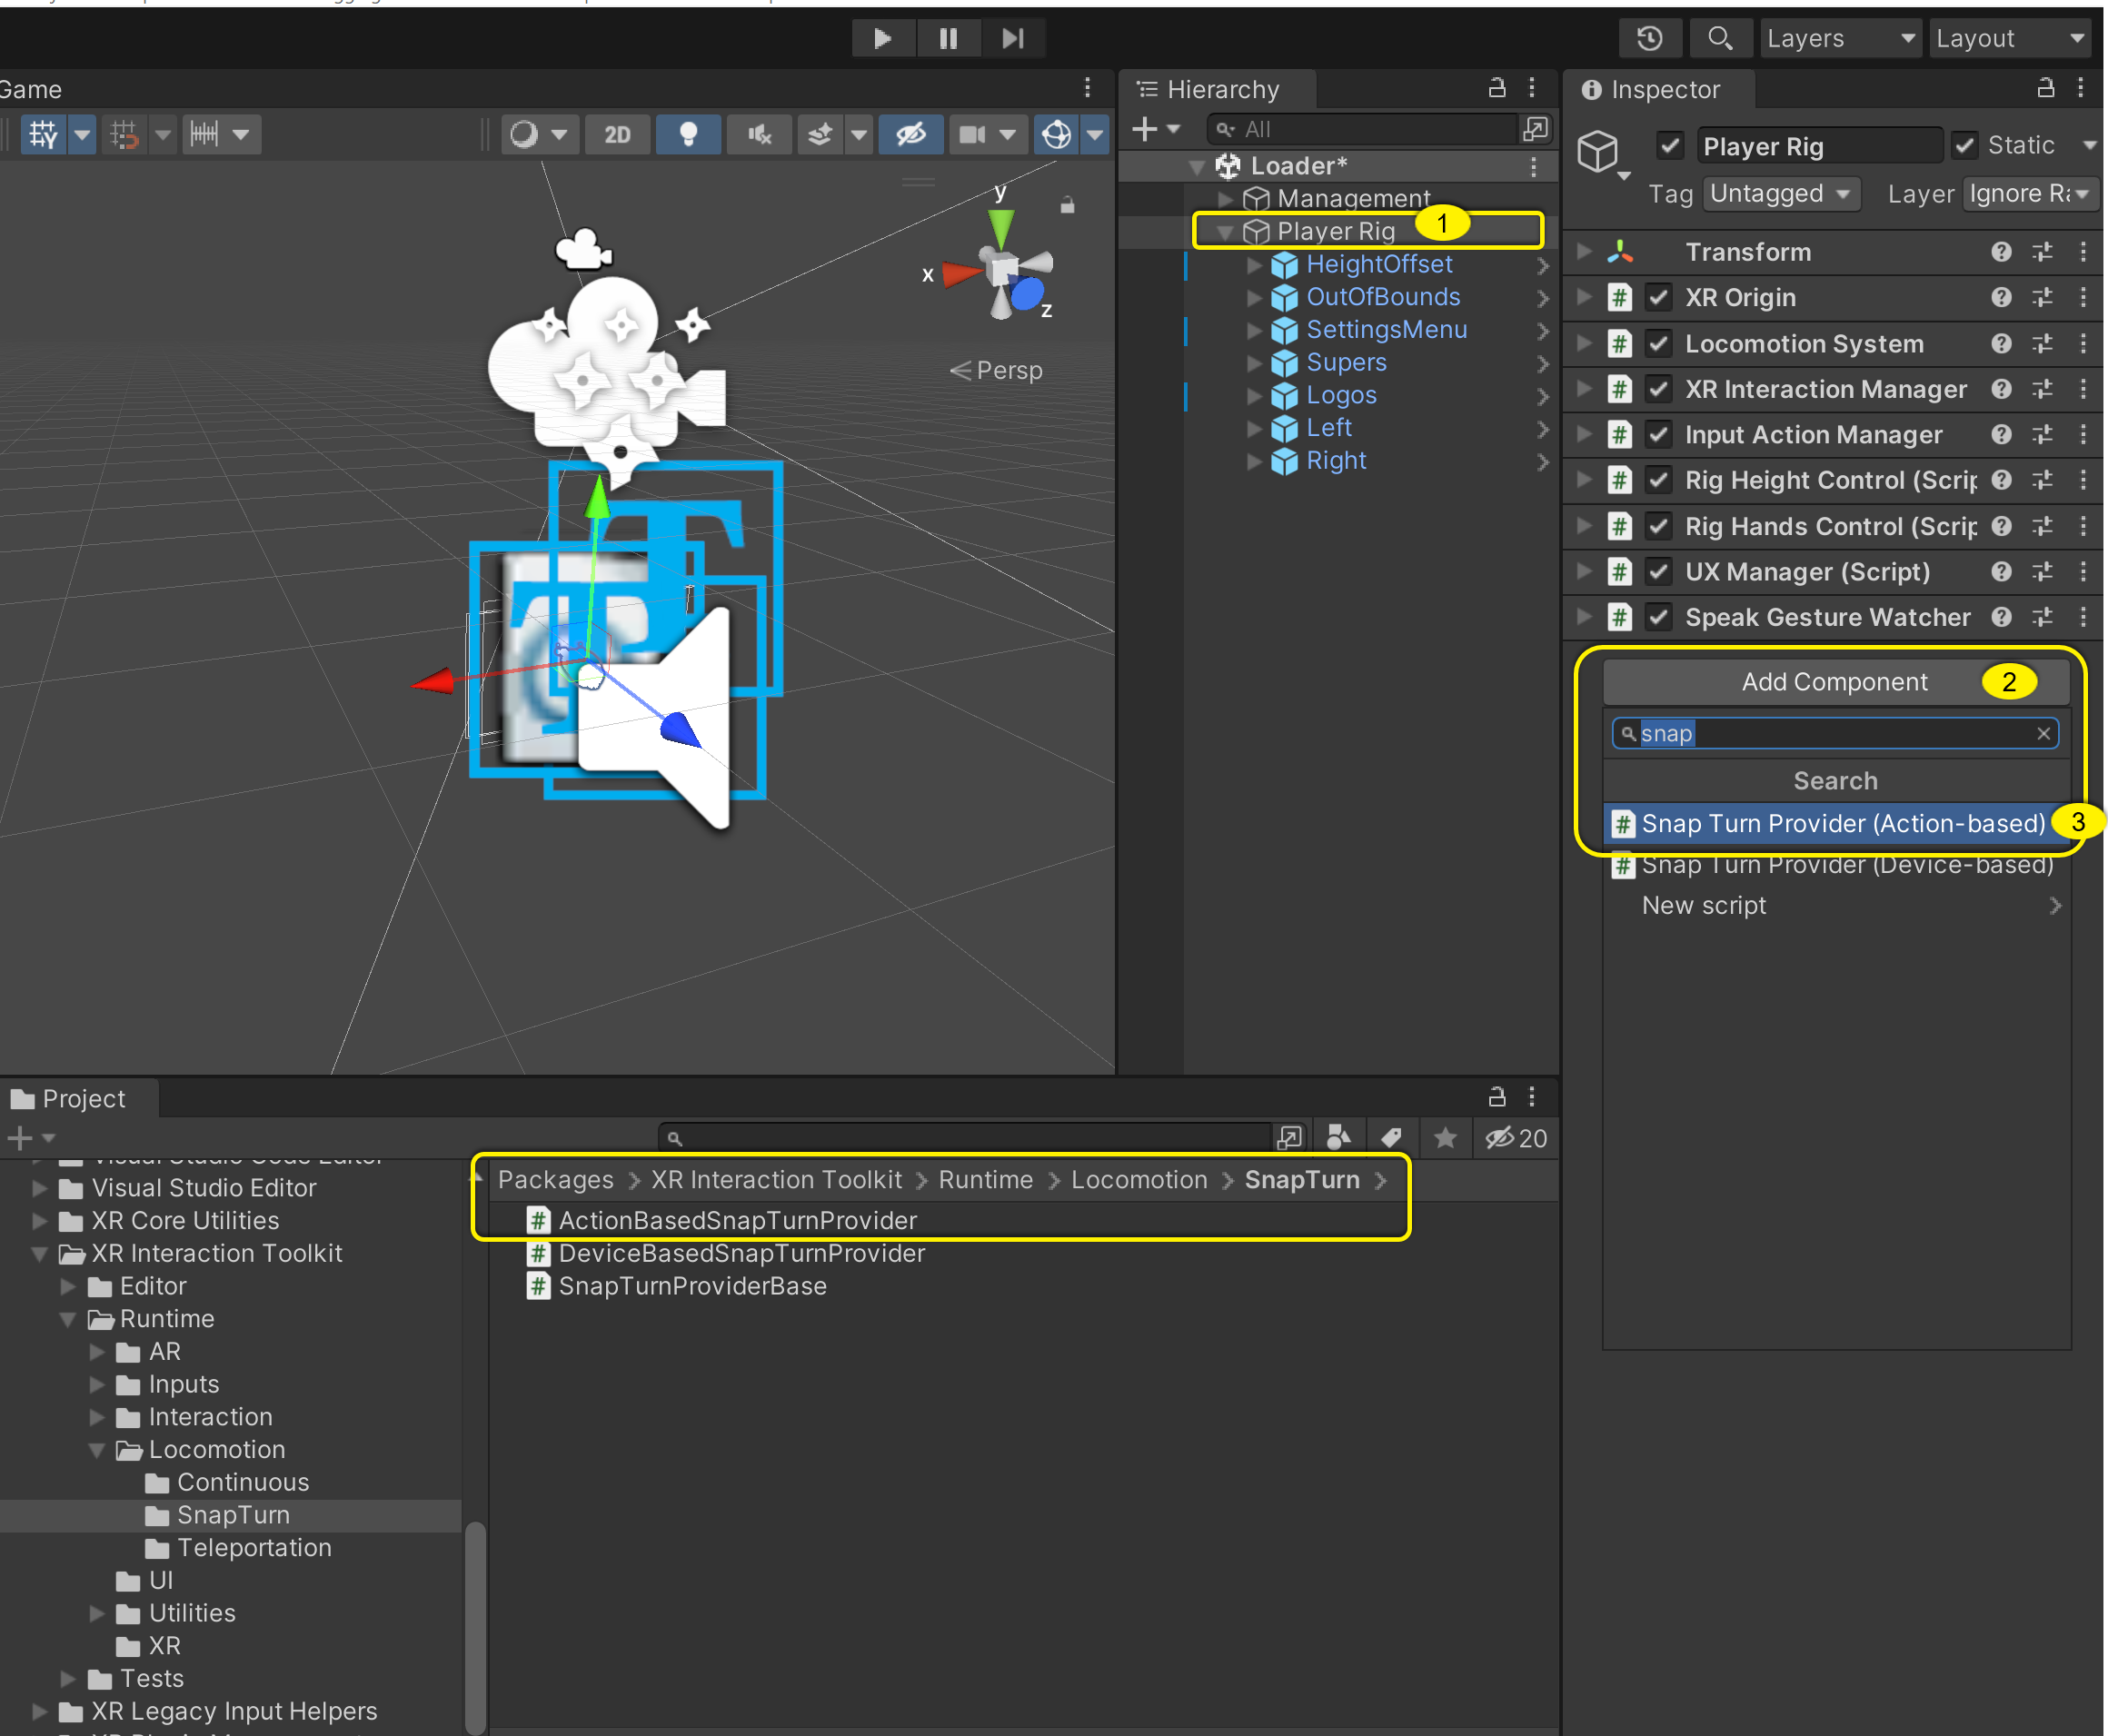
- Select “Player Rig” and “Add a component.”
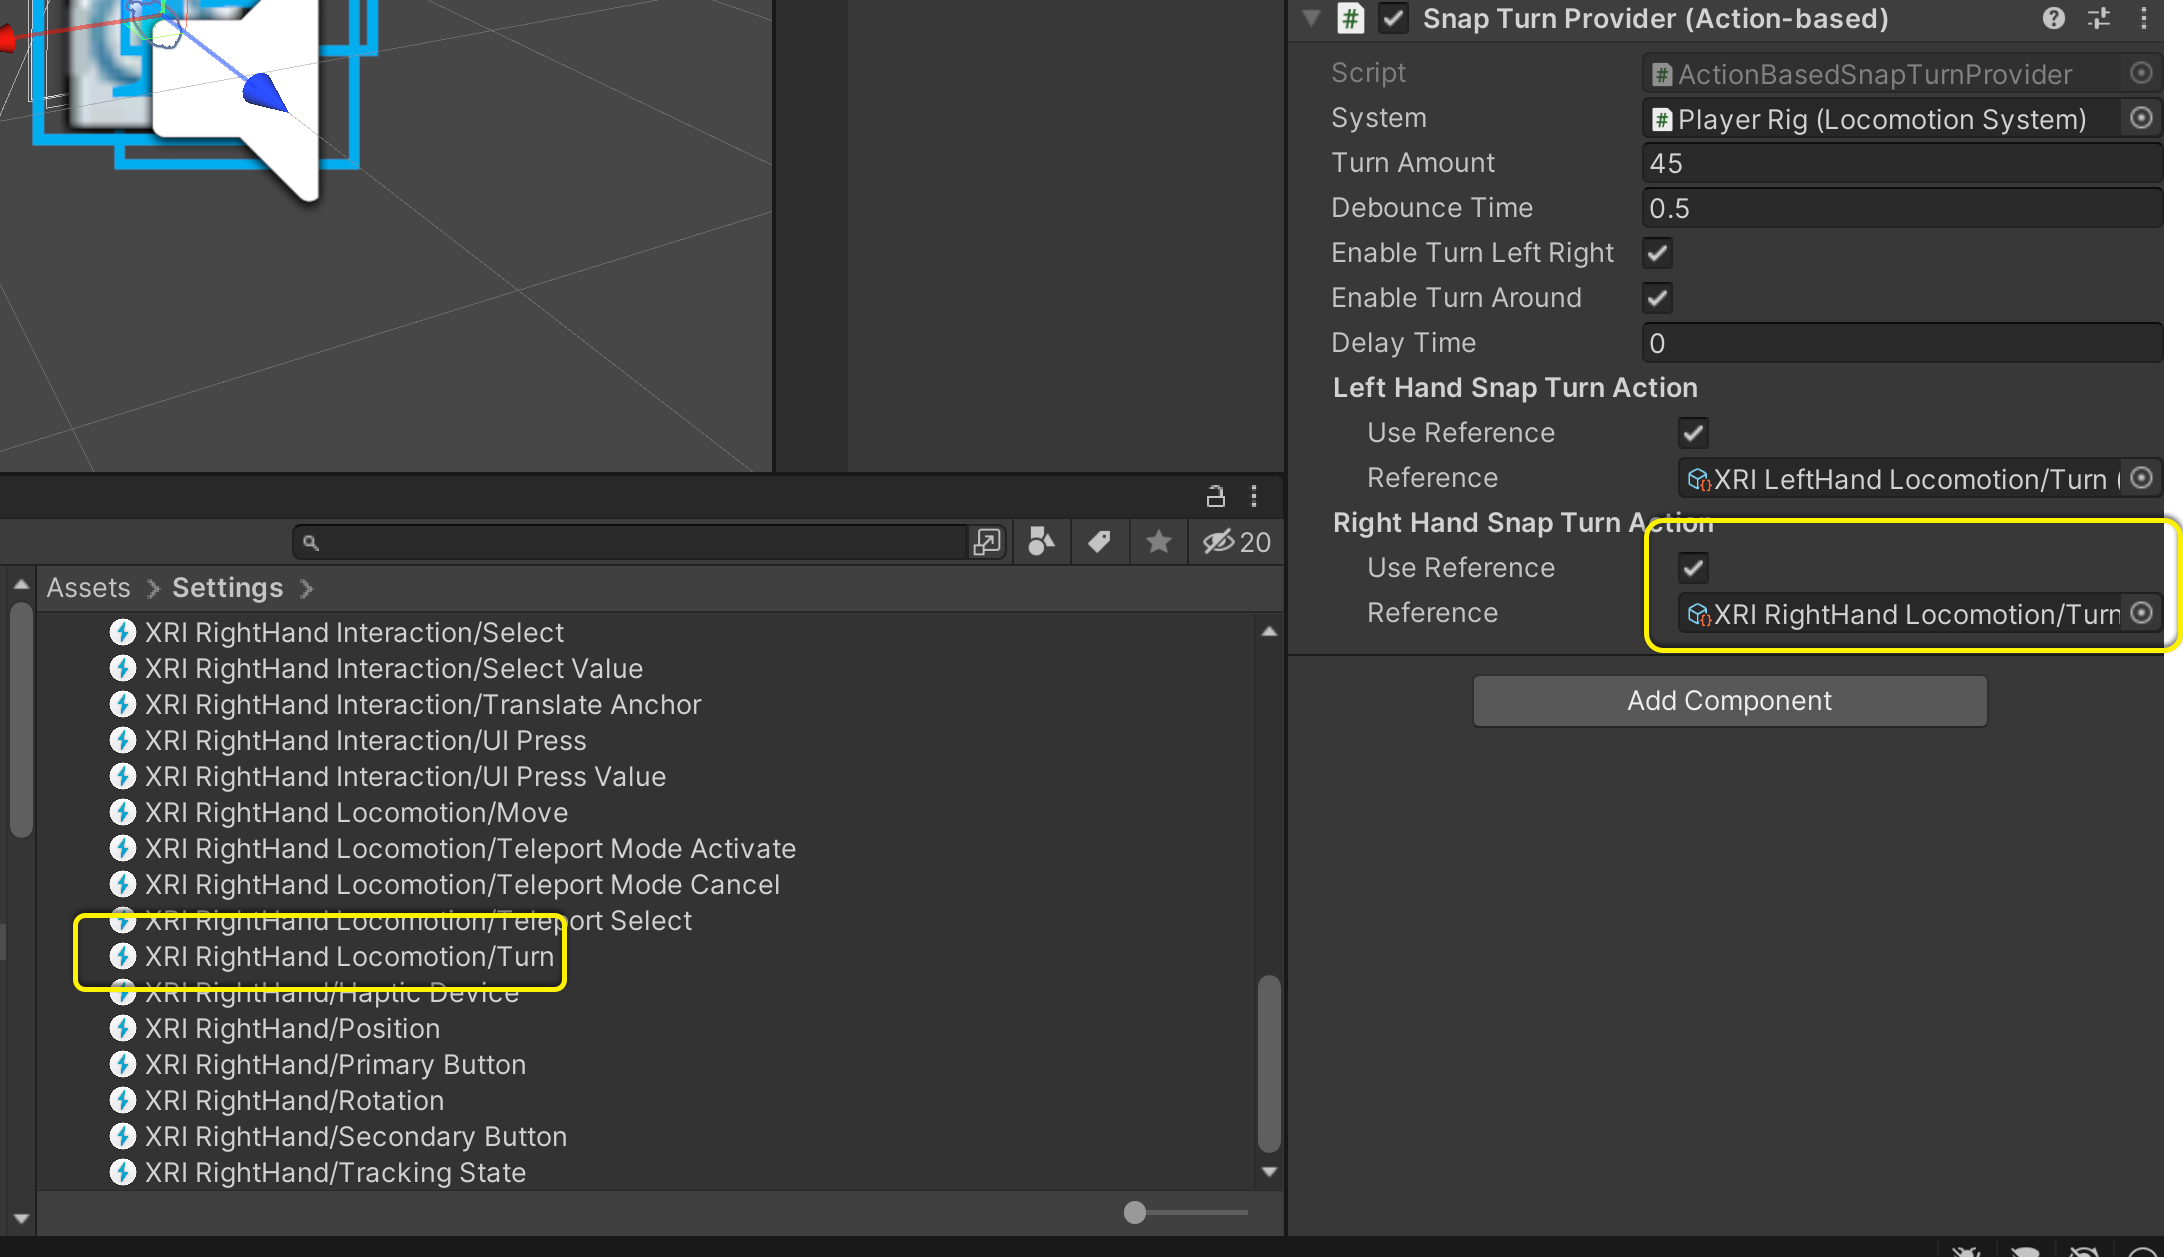
- Select “Snap Turn Provider (Action Based).” It is inside XR Interaction toolkit > RunTime > Locomotion > Snap Turn Provider (Action-based).
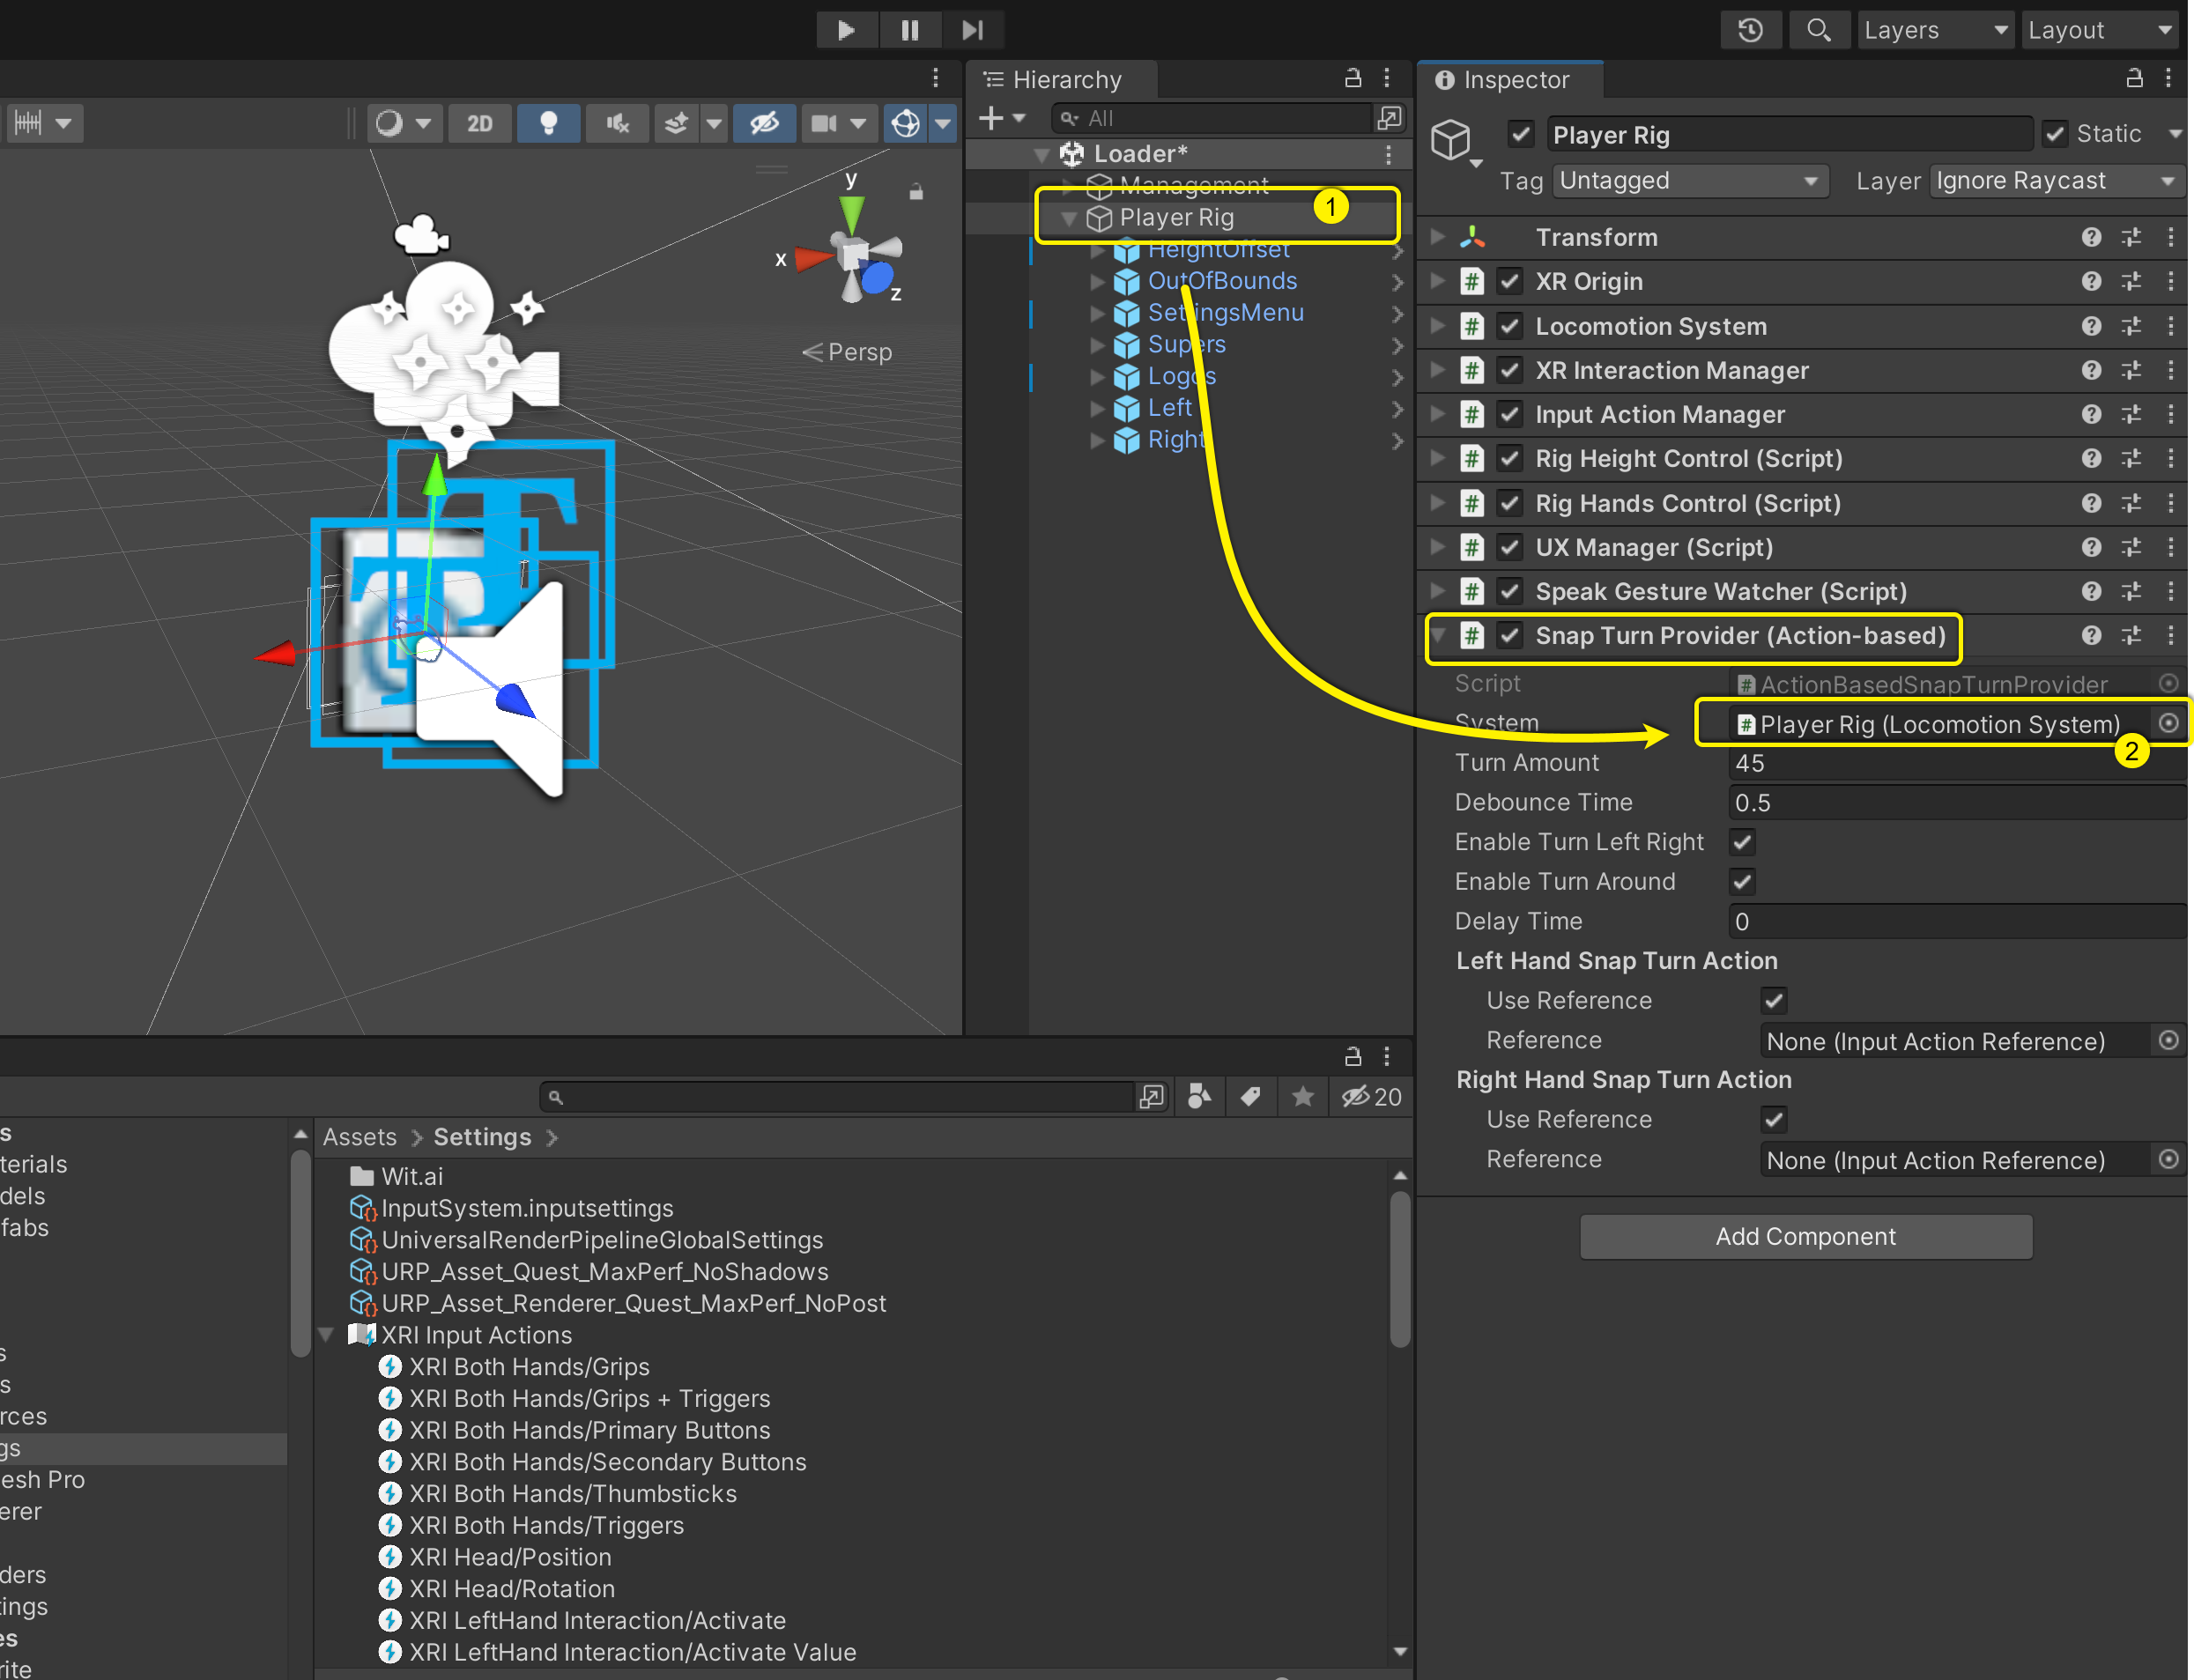
- Pass “Player Rig” as a reference to the “System” field
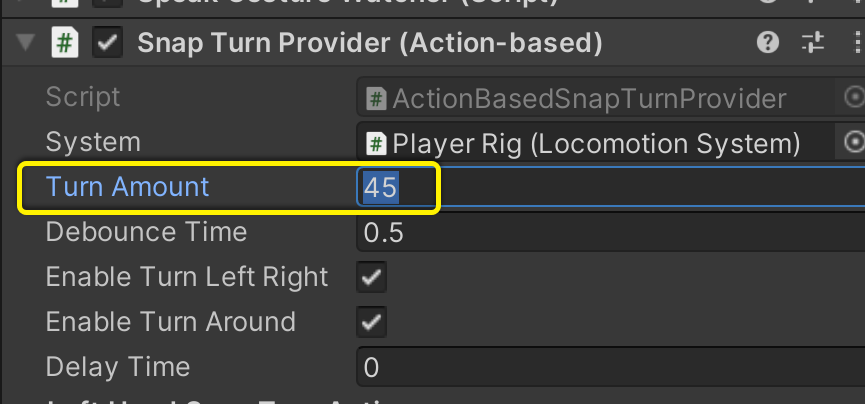
- Set “Turn Amount” by default it is set to “45.”
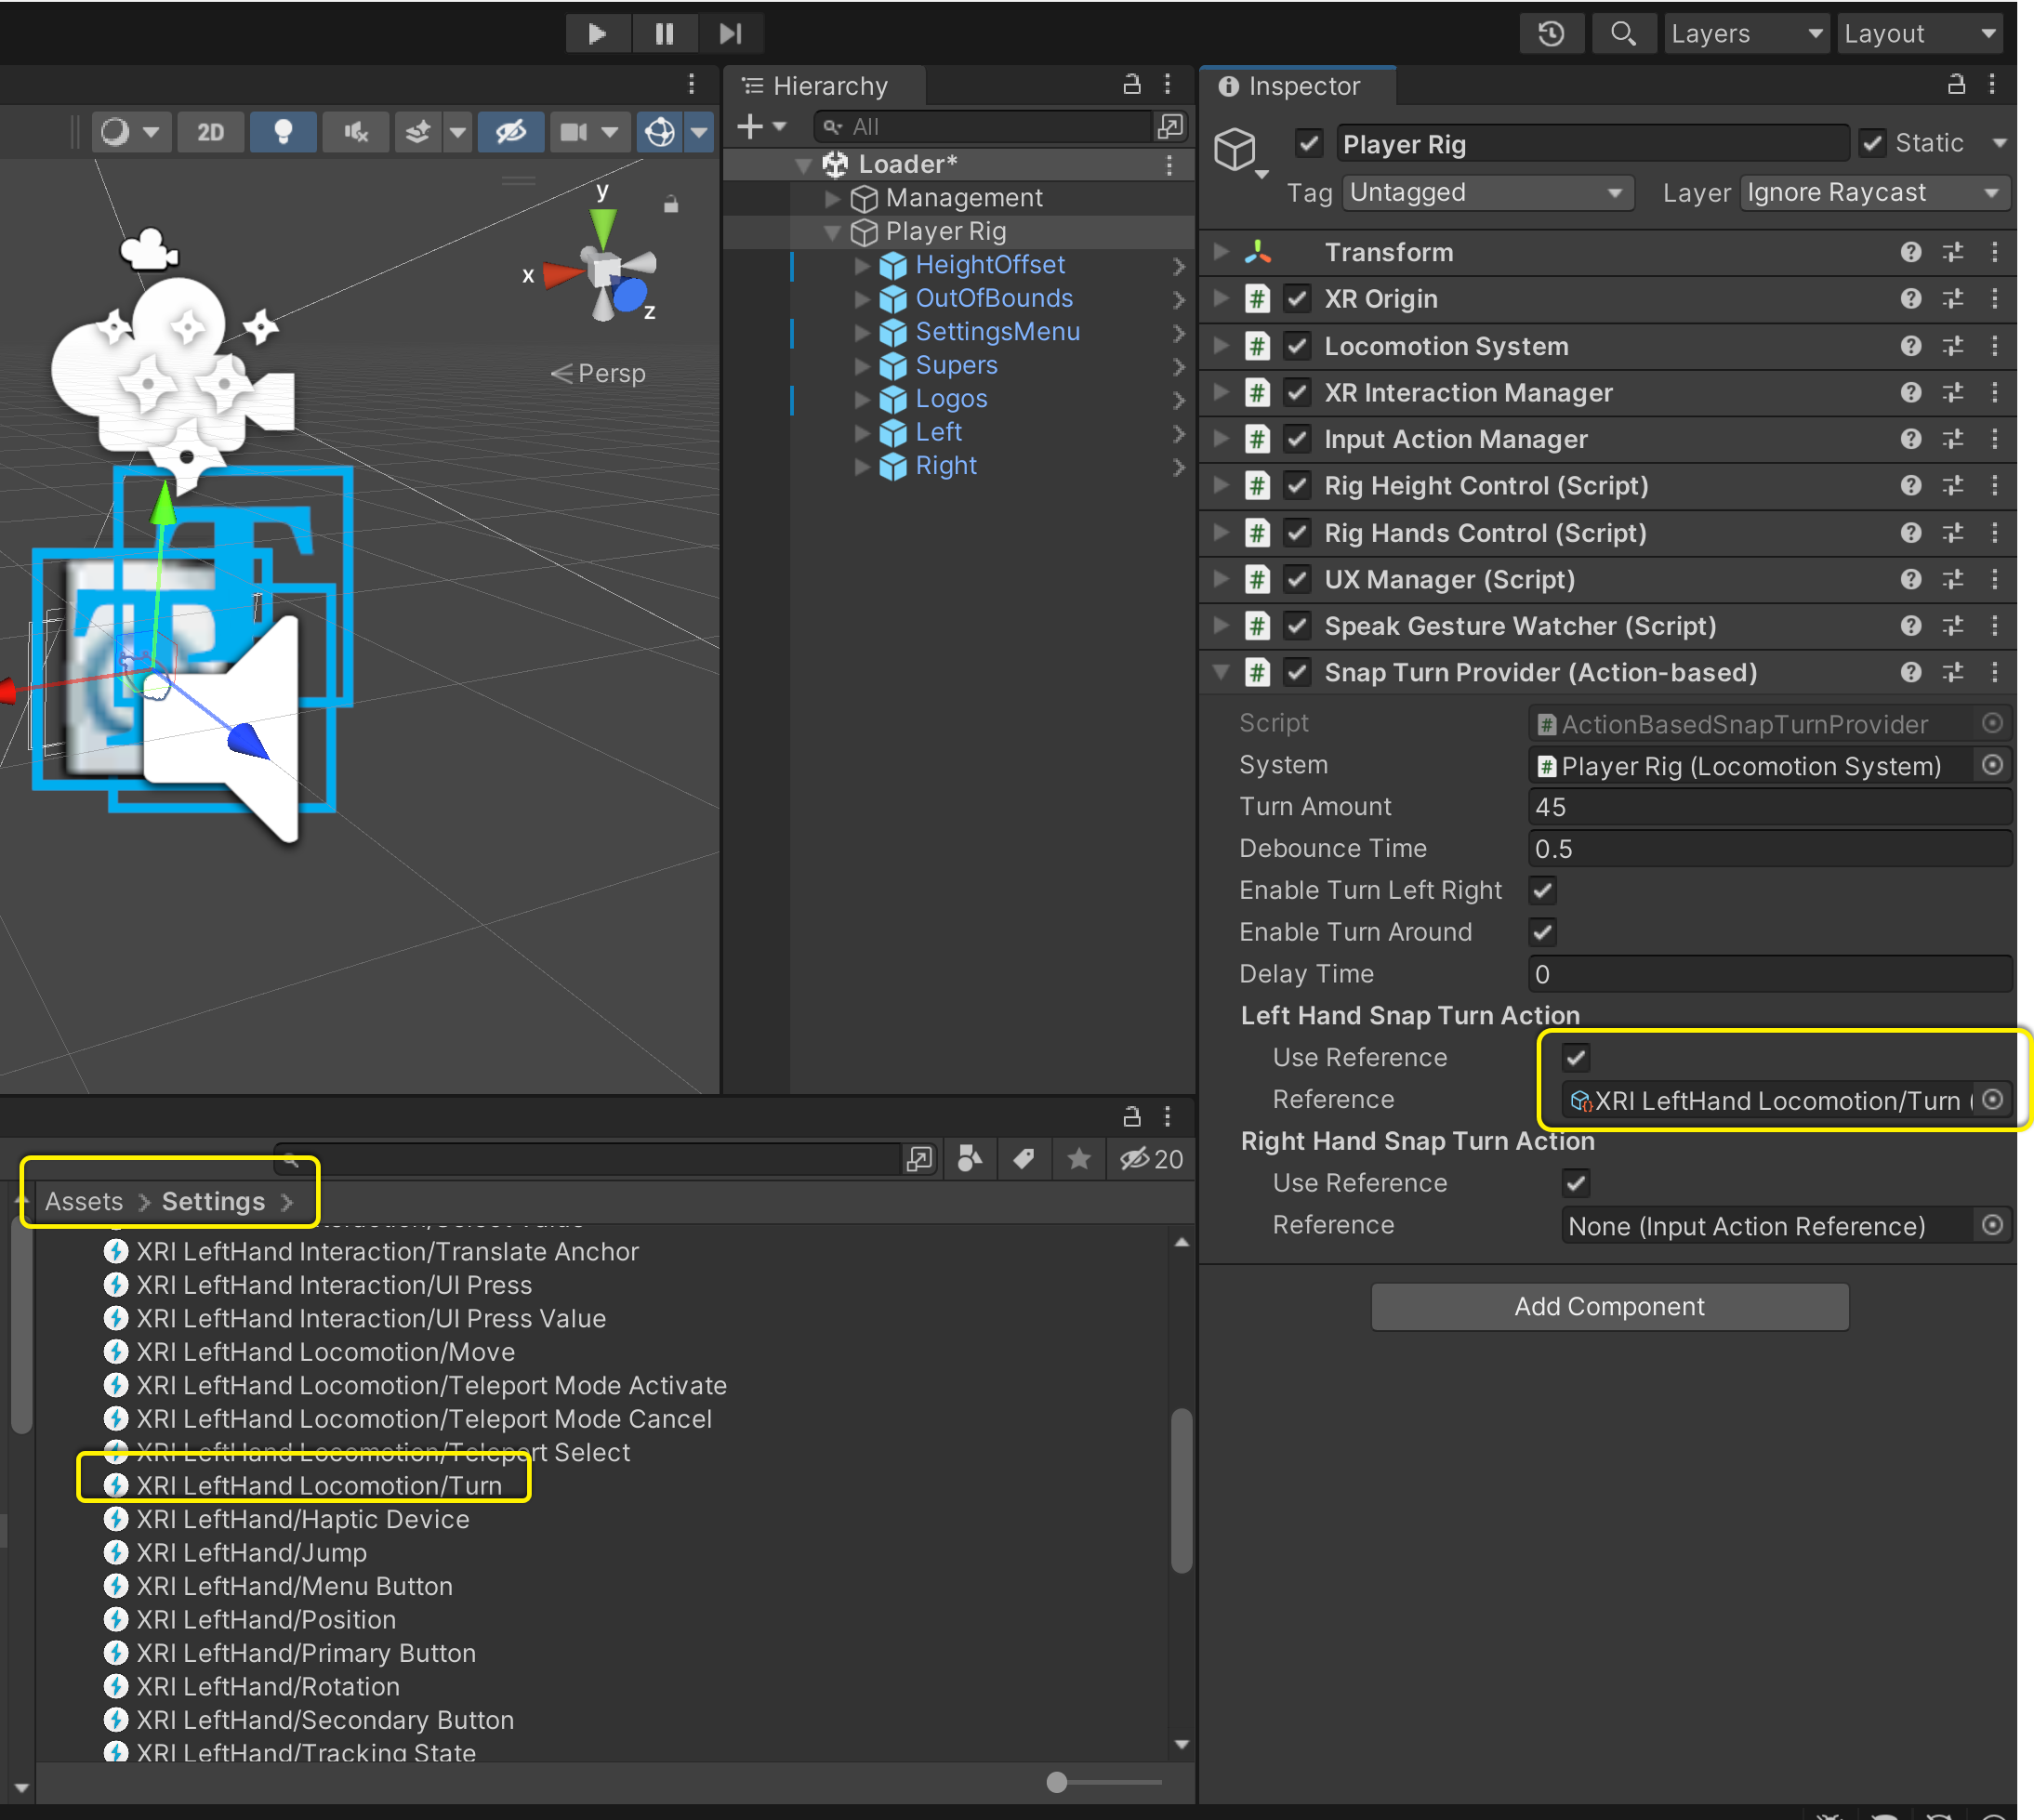
- Check the “Use Reference” checkbox for relevant input.
- Pass reference of “XRI Hand Name Locomotion/Turn,” which is in “Assets > Setting > XRI Input Action.”
The XRIT code
        using UnityEngine.InputSystem;
        using UnityEngine.InputSystem.Controls;
        using UnityEngine.XR.Interaction.Toolkit.Inputs;

        namespace UnityEngine.XR.Interaction.Toolkit
        {
            ///  <summary>
            /// A locomotion provider that allows the user to rotate their rig using a 2D axis input
            /// from an input system action.
            ///  </summary>
            [AddComponentMenu("XR/Locomotion/Snap Turn Provider (Action-based)", 11)]
            [HelpURL(XRHelpURLConstants.k_ActionBasedSnapTurnProvider)]
            public class ActionBasedSnapTurnProvider : SnapTurnProviderBase
            {
                [SerializeField]
                [Tooltip("The Input System Action that will be used to read Snap Turn data from the left hand controller. Must be a Value Vector2 Control.")]
                InputActionProperty m_LeftHandSnapTurnAction;
                ///  <summary>
                /// The Input System Action that Unity uses to read Snap Turn data sent from the left hand controller. Must be a  <see cref="InputActionType.Value"/>  <see cref="Vector2Control"/> Control.
                ///  </summary>
                public InputActionProperty leftHandSnapTurnAction
                {
                    get => m_LeftHandSnapTurnAction;
                    set => SetInputActionProperty(ref m_LeftHandSnapTurnAction, value);
                }

                [SerializeField]
                [Tooltip("The Input System Action that will be used to read Snap Turn data from the right hand controller. Must be a Value Vector2 Control.")]
                InputActionProperty m_RightHandSnapTurnAction;
                ///  <summary>
                /// The Input System Action that Unity uses to read Snap Turn data sent from the right hand controller. Must be a  <see cref="InputActionType.Value"/>  <see cref="Vector2Control"/> Control.
                ///  </summary>
                public InputActionProperty rightHandSnapTurnAction
                {
                    get => m_RightHandSnapTurnAction;
                    set => SetInputActionProperty(ref m_RightHandSnapTurnAction, value);
                }

                ///  <summary>
                /// See  <see cref="MonoBehaviour"/>.
                ///  </summary>
                protected void OnEnable()
                {
                    m_LeftHandSnapTurnAction.EnableDirectAction();
                    m_RightHandSnapTurnAction.EnableDirectAction();
                }

                ///  <summary>
                /// See  <see cref="MonoBehaviour"/>.
                ///  </summary>
                protected void OnDisable()
                {
                    m_LeftHandSnapTurnAction.DisableDirectAction();
                    m_RightHandSnapTurnAction.DisableDirectAction();
                }

                ///  <inheritdoc />
                protected override Vector2 ReadInput()
                {
                    var leftHandValue = m_LeftHandSnapTurnAction.action?.ReadValue <Vector2>() ?? Vector2.zero;
                    var rightHandValue = m_RightHandSnapTurnAction.action?.ReadValue <Vector2>() ?? Vector2.zero;

                    return leftHandValue + rightHandValue;
                }

                void SetInputActionProperty(ref InputActionProperty property, InputActionProperty value)
                {
                    if (Application.isPlaying)
                        property.DisableDirectAction();

                    property = value;

                    if (Application.isPlaying && isActiveAndEnabled)
                        property.EnableDirectAction();
                }
            }
        }
Call to Action for Developers
Snap turning is the easiest option for complying with Meta’s accessibility recommendation for VRC7. Developers should implement this in their apps. This helps users who have limited motion as well as those who want to look behind in a seated position without a swivel chair.
Developers must remember that this method works for people with a functioning hand. While a method without hand control is not covered in the VRC, it’s worth considering solutions such as voice controls.
Acknowledgment
We would like to thank XR Access adXR for giving us feedback and improving this article.
